
Getting Started
Portal
App Registration
1. Log in to your Portal account.

2. Select “Application” in Developer.

3. Click “Edit App” on the top.

4. Input the appropriate information.
Bundle name represents the unique identifier of the application.
Domain name represents the URL of the website. You may separate multiple domains with semicolons(;).

5. You may view your app ID, app key, and bundle name here.

Merchant Registration
1. Log in to your Portal account.
2. Select “Create Merchant” on the left hand side.

3. Click “Create Merchant” on the top.
You may not create new merchants in Sandbox environment. Please use the preexisting merchants instead.

4. Input the appropriate information.
| Name | Usage |
|---|---|
| Connected Acquirer* | Acquirer bank or payment processor. |
| Acquirer Account* | Acquirer account number. |

IP Registration
*Please bind your server’s IP address to our server first before testing.
1. Log in to your Portal account.
2. Select “System Settings” in Developer.

3. Select the correct environment.
Make sure you choose the right environment on the top.
Sandbox environment does NOT share the same allowable IPs as production environment.

4. Input your IP.
This list will bind your server’s IP address to our server.
You may separate multiple IPs with semicolons(;).
The number after the backslash indicates subnet mask(0~32).
Each IPv4 address consists of 32 bits: 8bits.8bits.8bits.8bits
So, the range of all IPv4 addresses, in dot-decimal notation, falls between 0.0.0.0 ~ 255.255.255.255
The subnet mask determines the number of bits that must match your IP address.
Please refer to the following example:
| IP | Subnet Mask | Acceptable IP |
|---|---|---|
| 1.2.3.4/0 | 0 | 0.0.0.0 ~ 255.255.255.255 |
| 1.2.3.4/8 | 8 | 1.0.0.0 ~ 1.255.255.255 |
| 1.2.3.4/16 | 16 | 1.2.0.0 ~ 1.2.255.255 |
| 1.2.3.4/24 | 24 | 1.2.3.0 ~ 1.2.3.255 |
| 1.2.3.4/32 | 32 | 1.2.3.4 |

People Registration
1. Log in to your Portal account.
2. Select “Account Management” on the top.

3. Click “Create People”.

4. You may register new accounts and alter their permission status.
You may use our default options or change the permission yourself.
Merchant Notification
1. Log in to your Portal account.
2. Select “Create Merchant” on the left hand side.
3. Select the merchant you wish to enable this feature.

4. Input the appropriate information.

Apple Pay on the Web Merchant Setting
If you enable Apple Pay on the Web Merchant Application Service, you can ignore all the processes in Getting Started > Apple Pay (it means you don’t need to register Apple Pay Developer Account ).
You just need to set up the relevant information on TapPay Portal and you will get Apple Pay merchant identifier successfully.
Please complete the following steps:
1. Log in to your Portal account
2. Choose Payment methods > Apple Pay on the Web, click 『Create Apple Pay Setting 』
3. Fill in domain names, download domain verification file, host the domain verification file under the storage path, and then click『Submit』
4. After finishing settings, you will get an Apple Pay merchant identifier. Please use this merchant identifier in the Sandbox environment.
If you want to enable this service in the Production environment, please complete following steps:
1. Contact TapPay Support
2. Log in to your Portal account
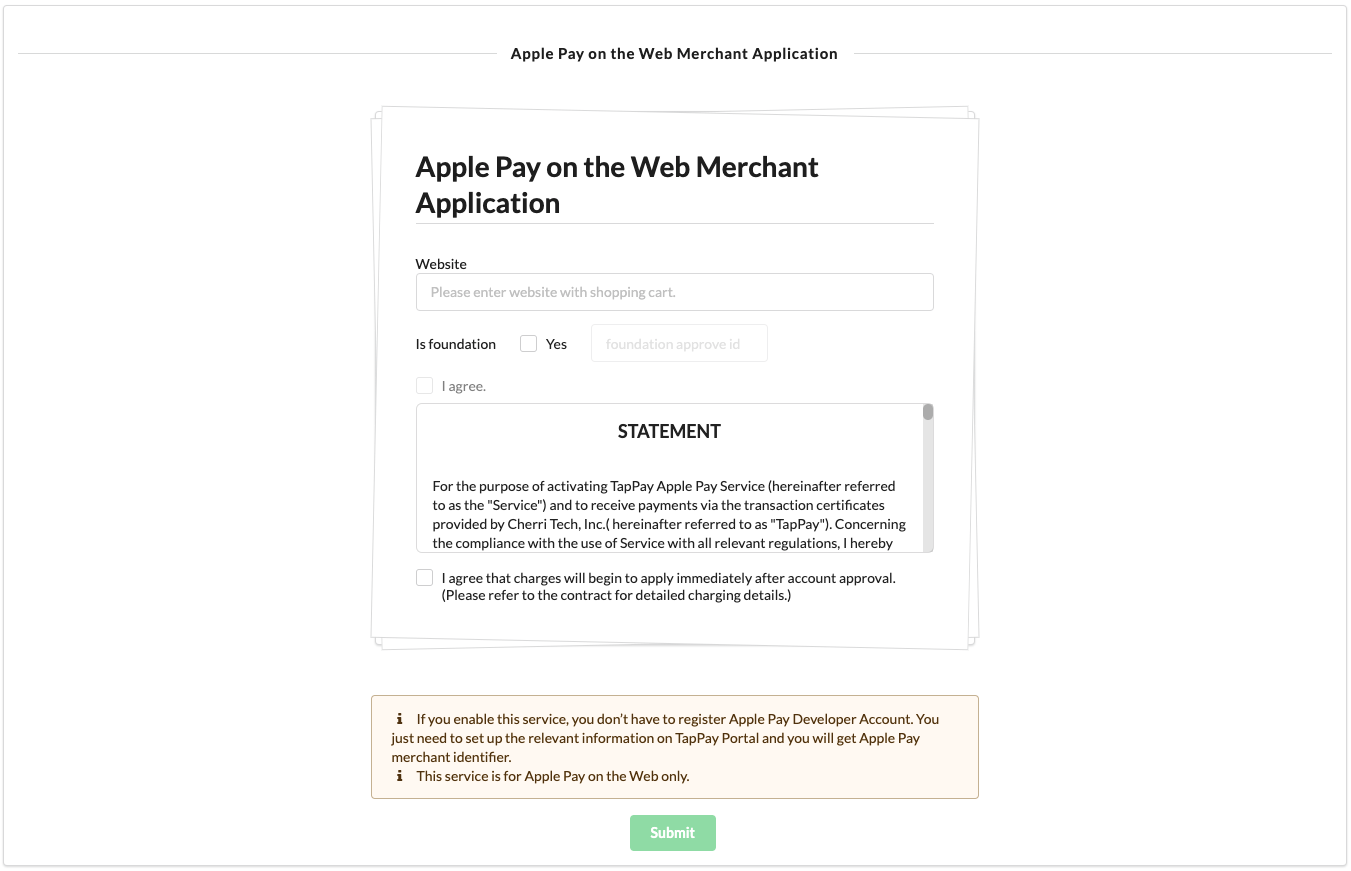
3. Go to Activate > Apple Pay on The Web. Fill in the website and agree to the declaration. Foundation Approved ID is required if you are a foundation.
4. You will see the following picture after submitting.
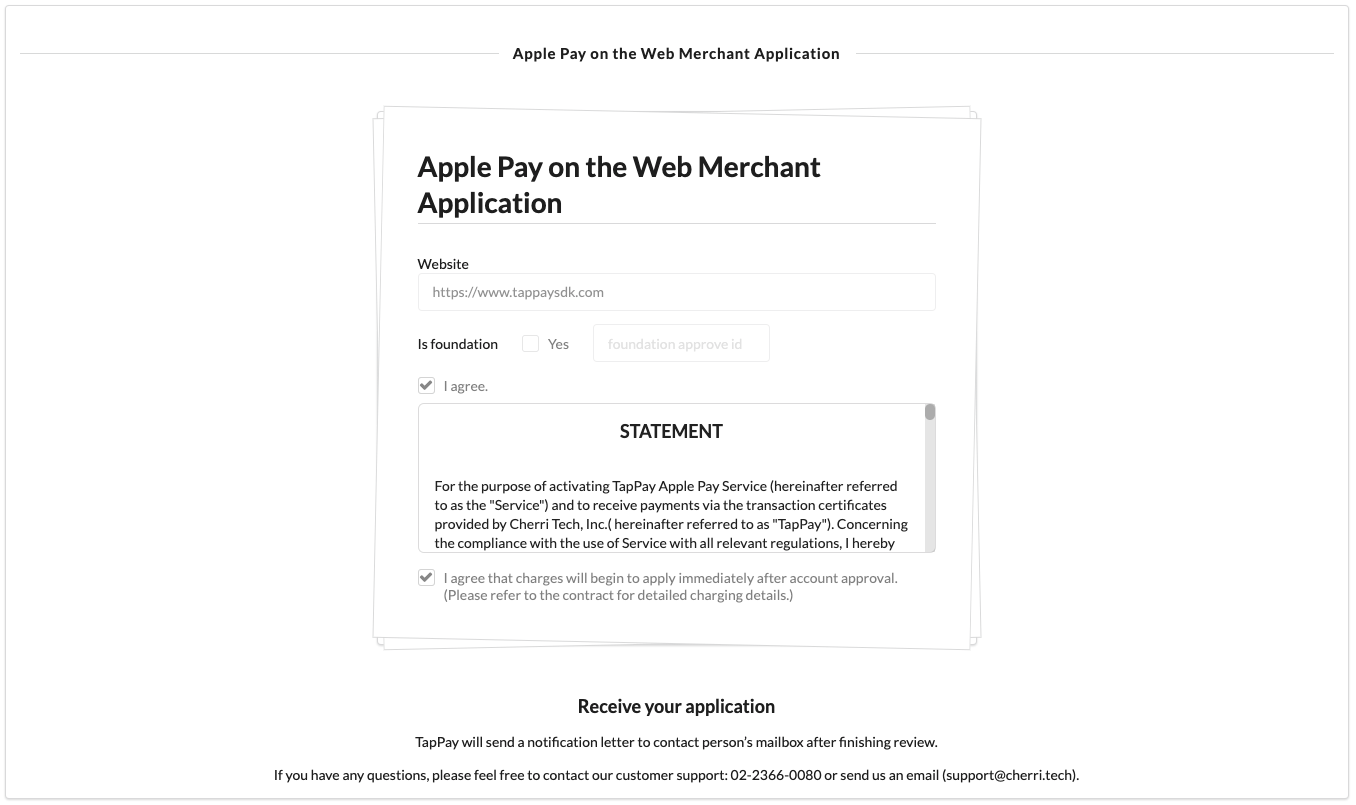
5. TapPay will send a notification letter to contact person mailbox after reviewing. And you can enjoy your service in the Production environment!
Apple Pay
Create Merchant ID
If you meet any condition as below, please complete the following steps.
1. Need a developer account for Web but didn’t purchase [Apple Pay on the Web Merchant Application Service]
2. Need a developer account for App
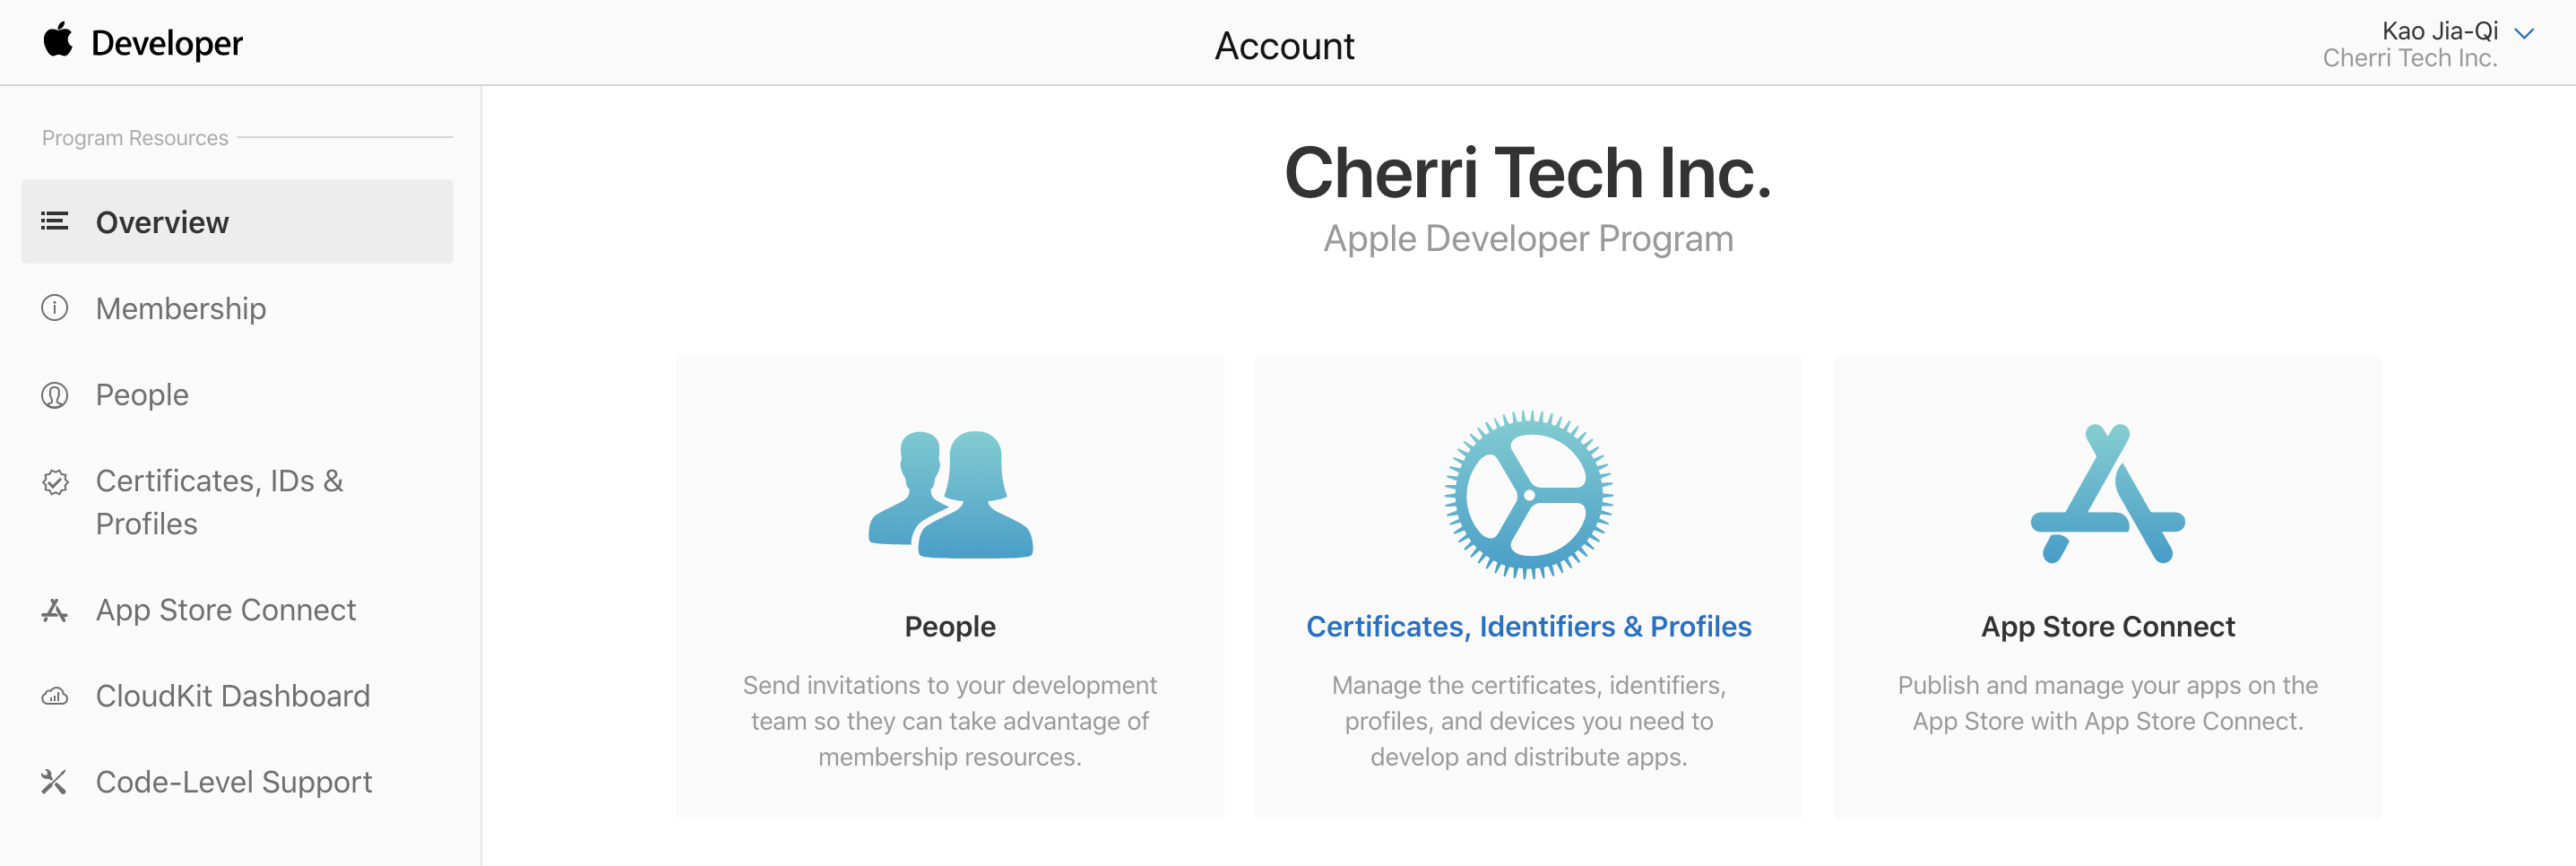
1. Log in to your Apple Developer account. If you don’t have one, create one now.
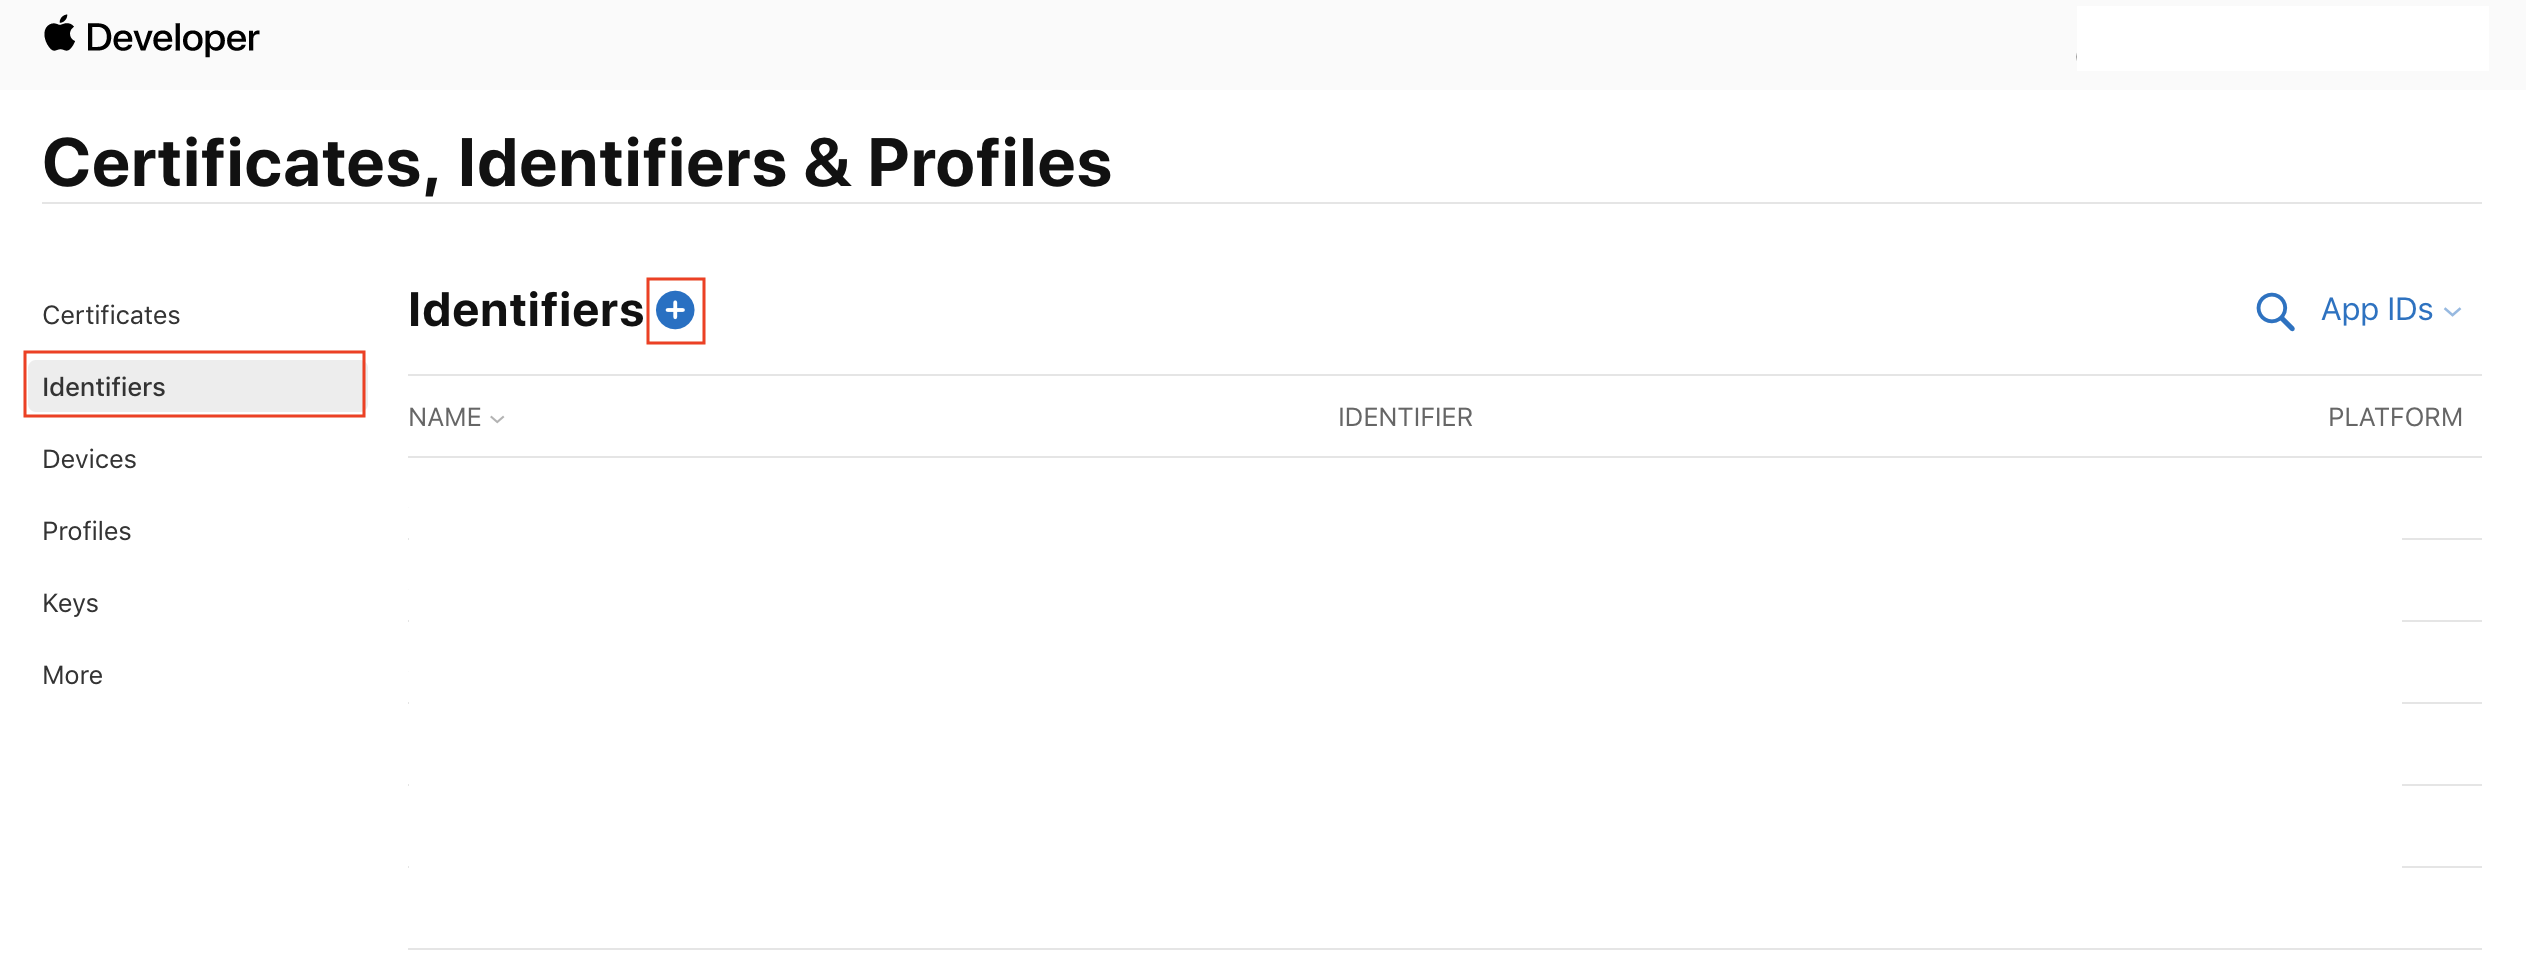
Click “Certificates, Identifiers & Profiles.”
2. Select identifiers and click + button.
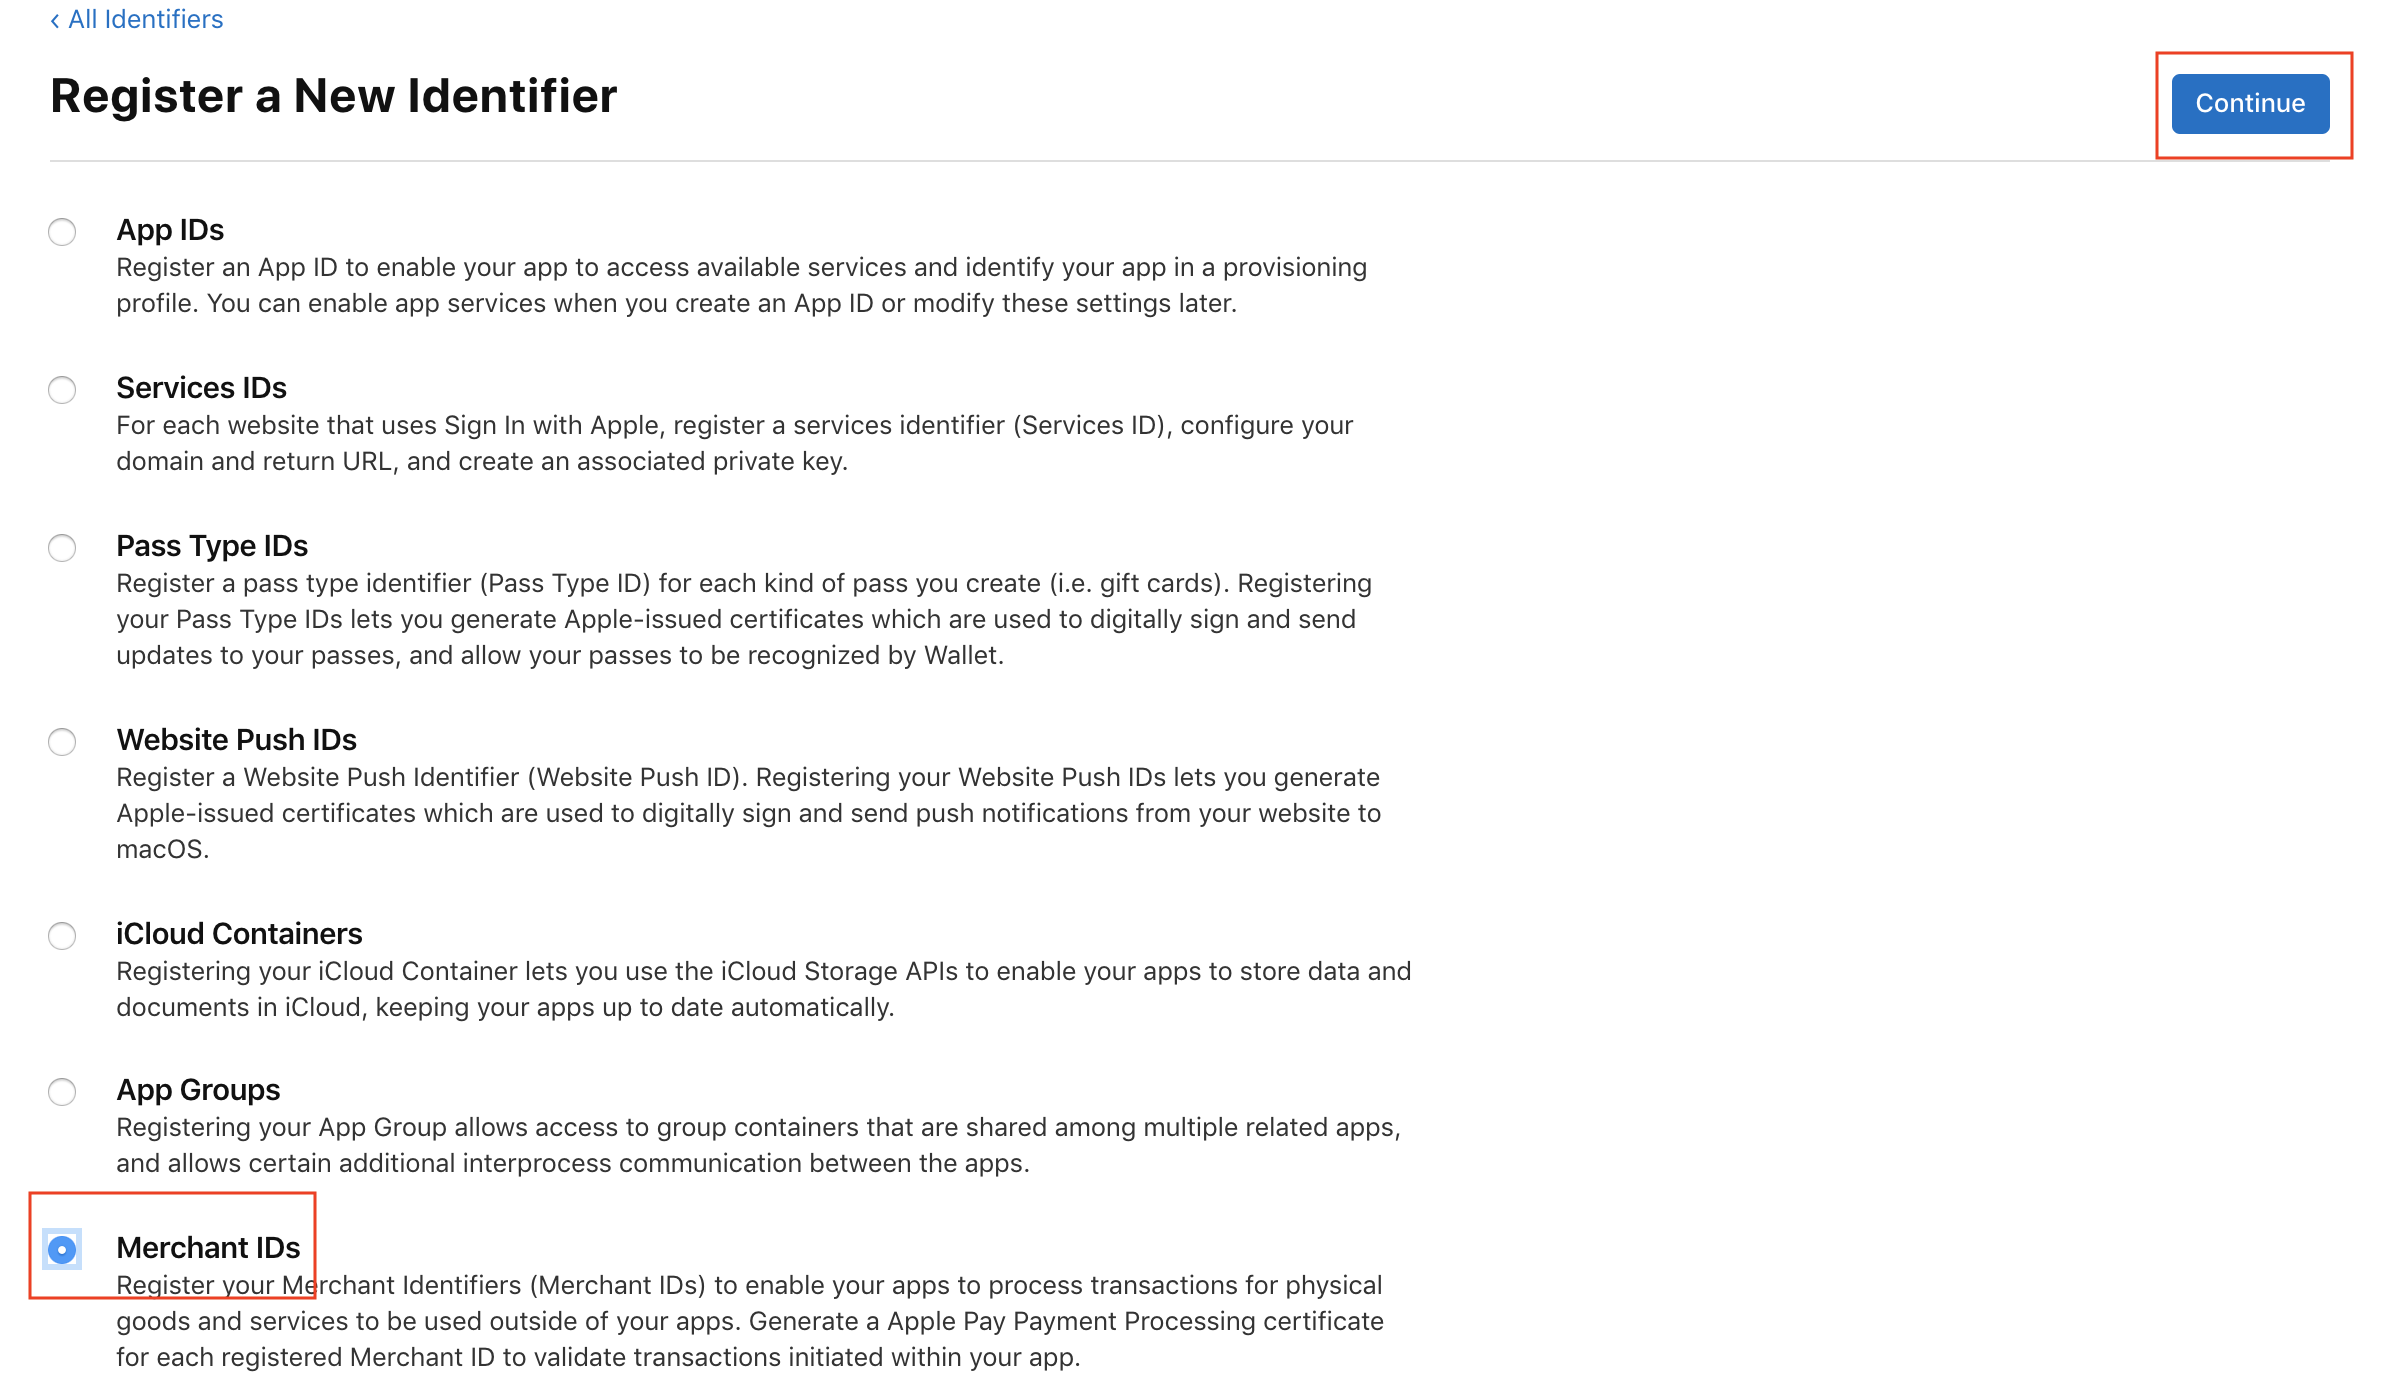
3. Select Merchant IDs click Continue button.
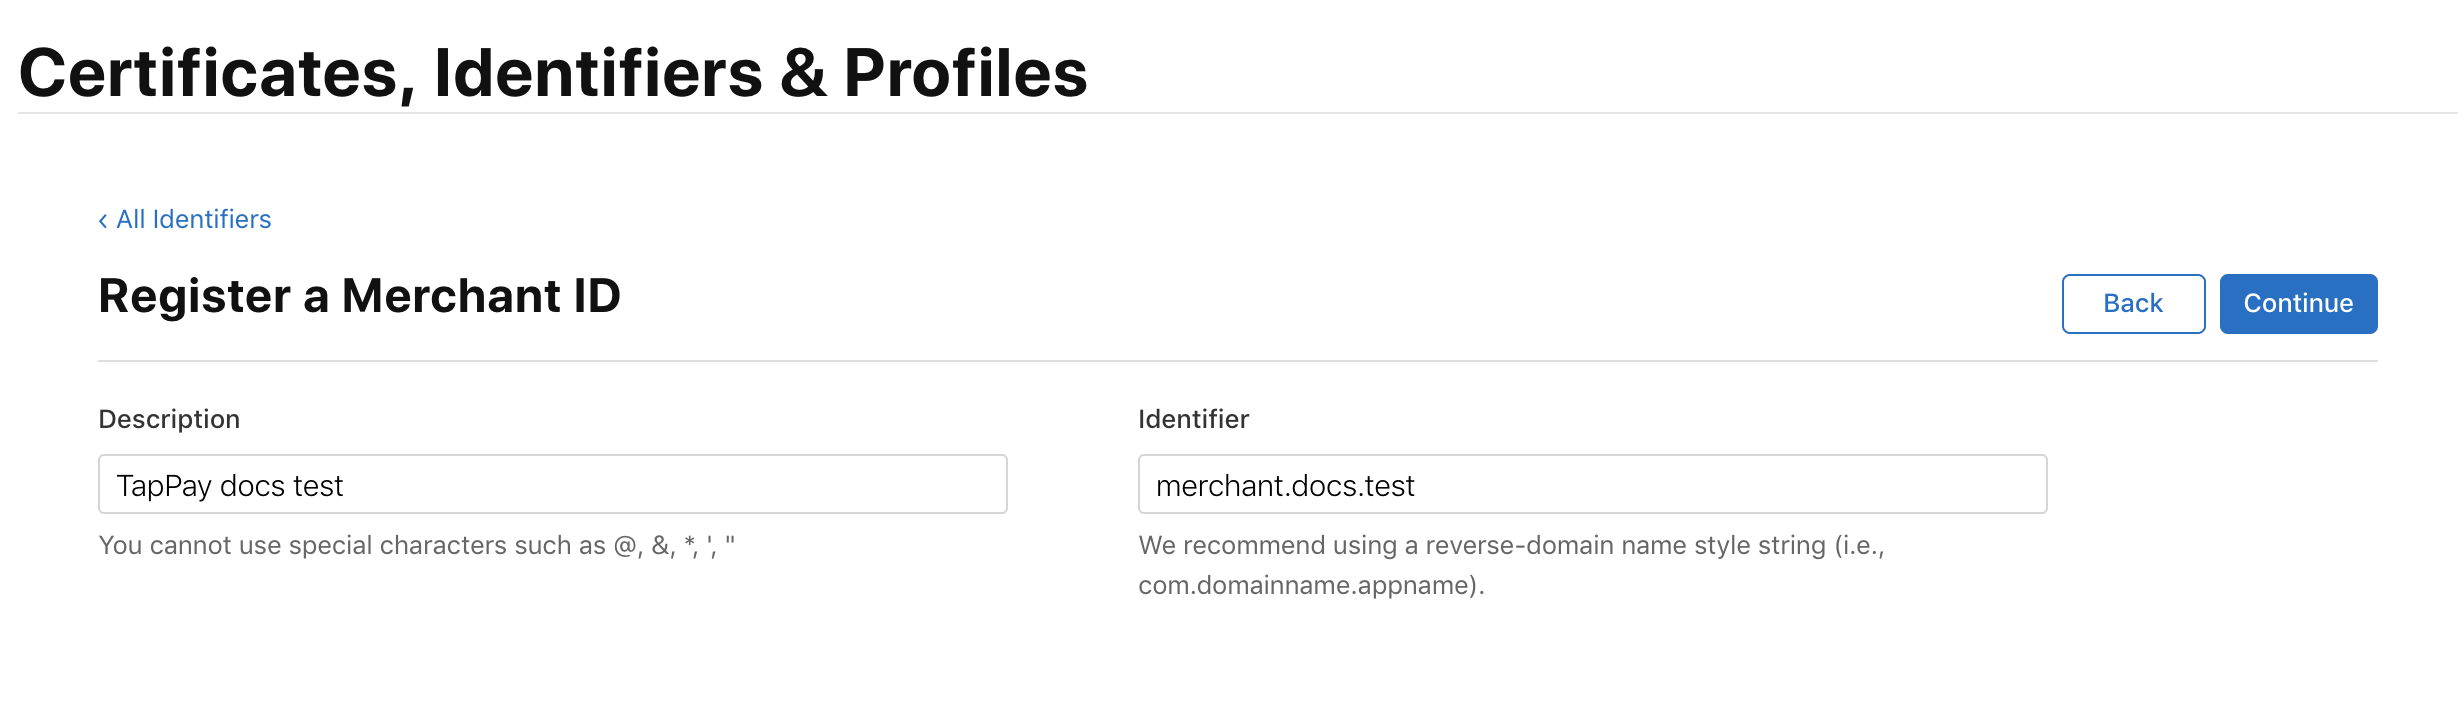
4. Fill out the appropriate information, click Continue button.
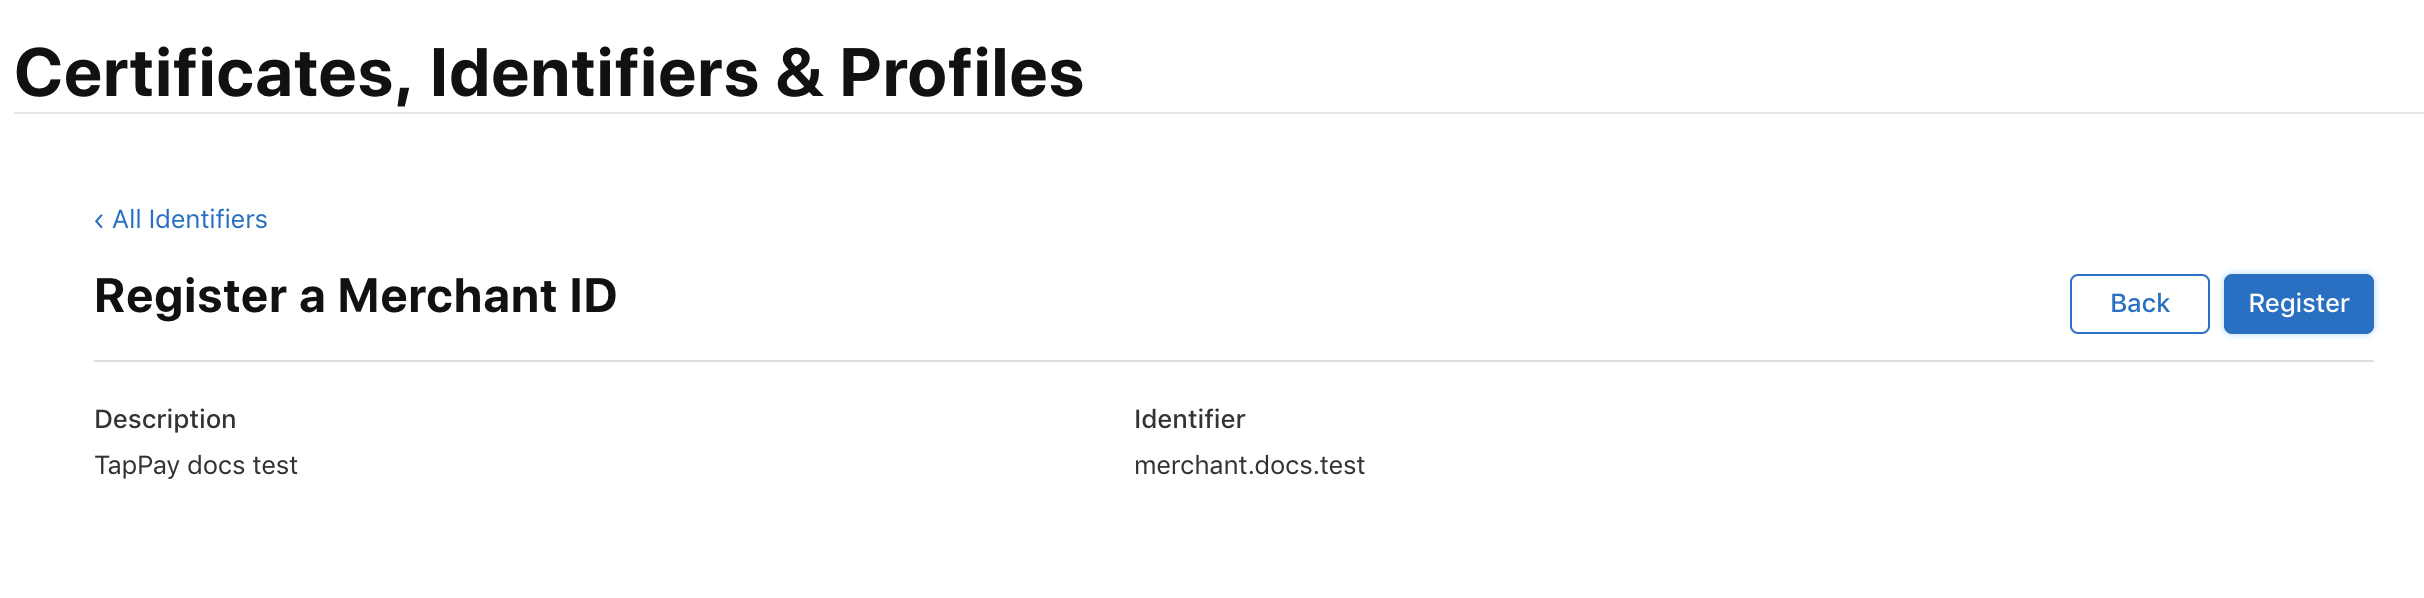
5. Double check your Merchant ID information, click Register button, create Merchant ID success.
Create Payment Processing Certificate
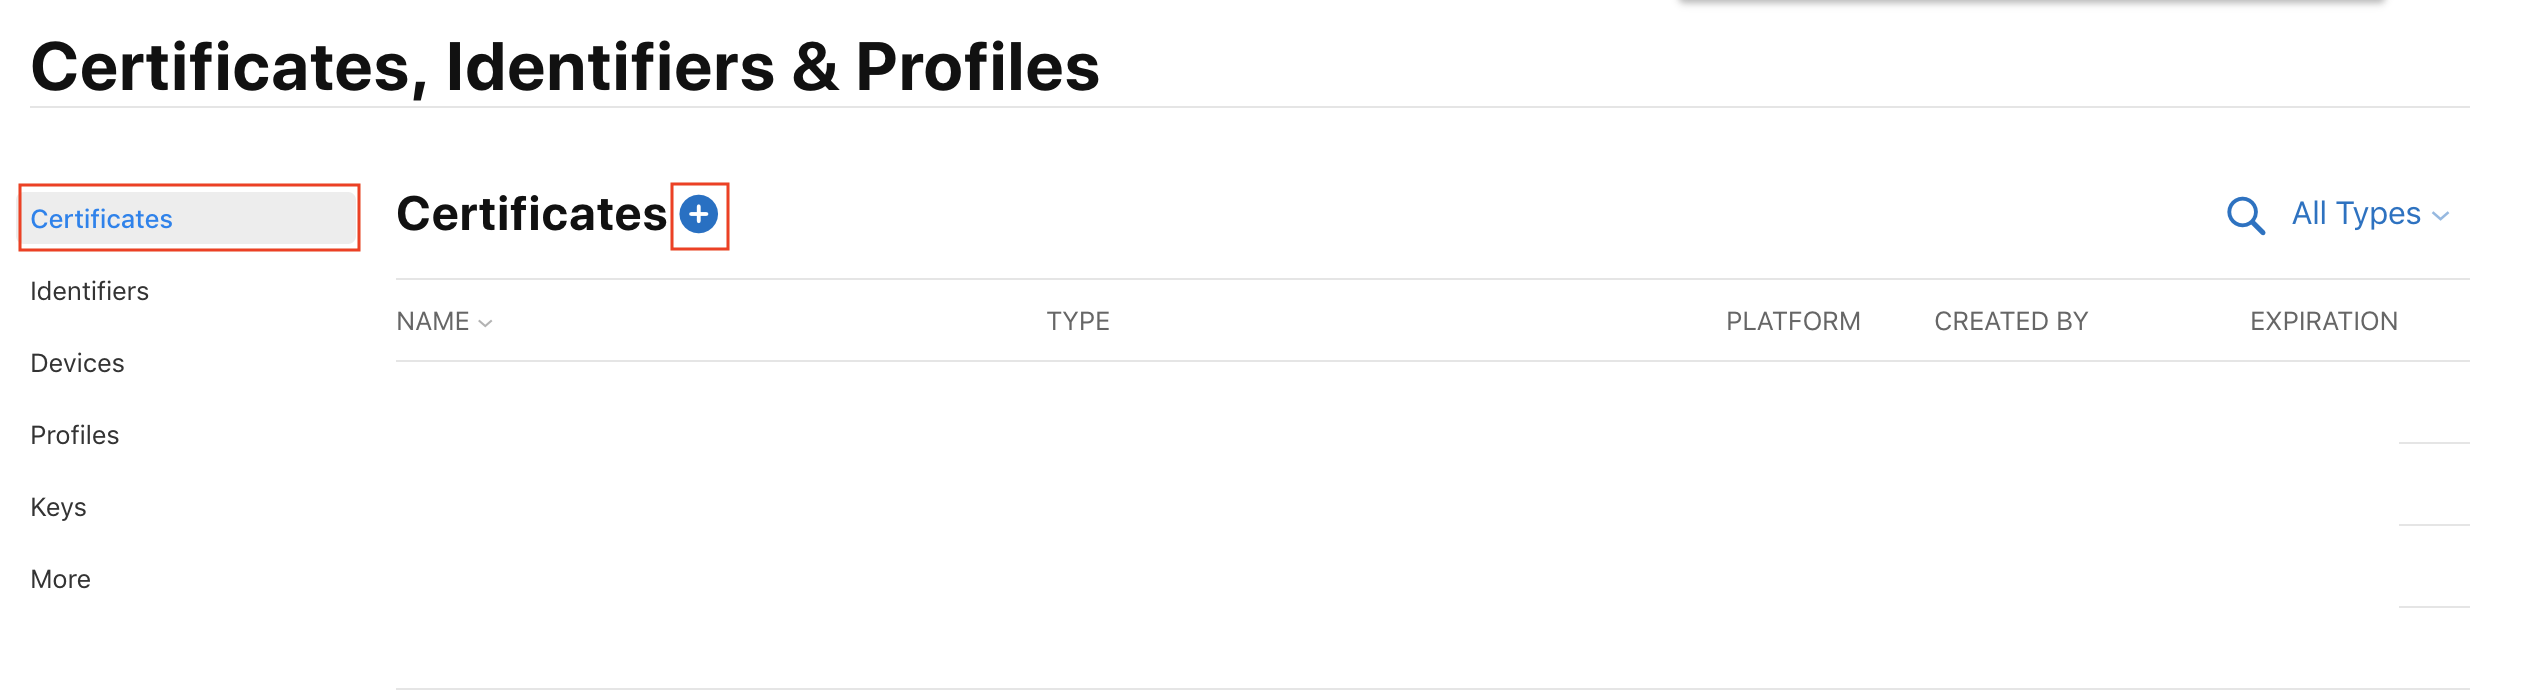
1. Select Certificate click + button.

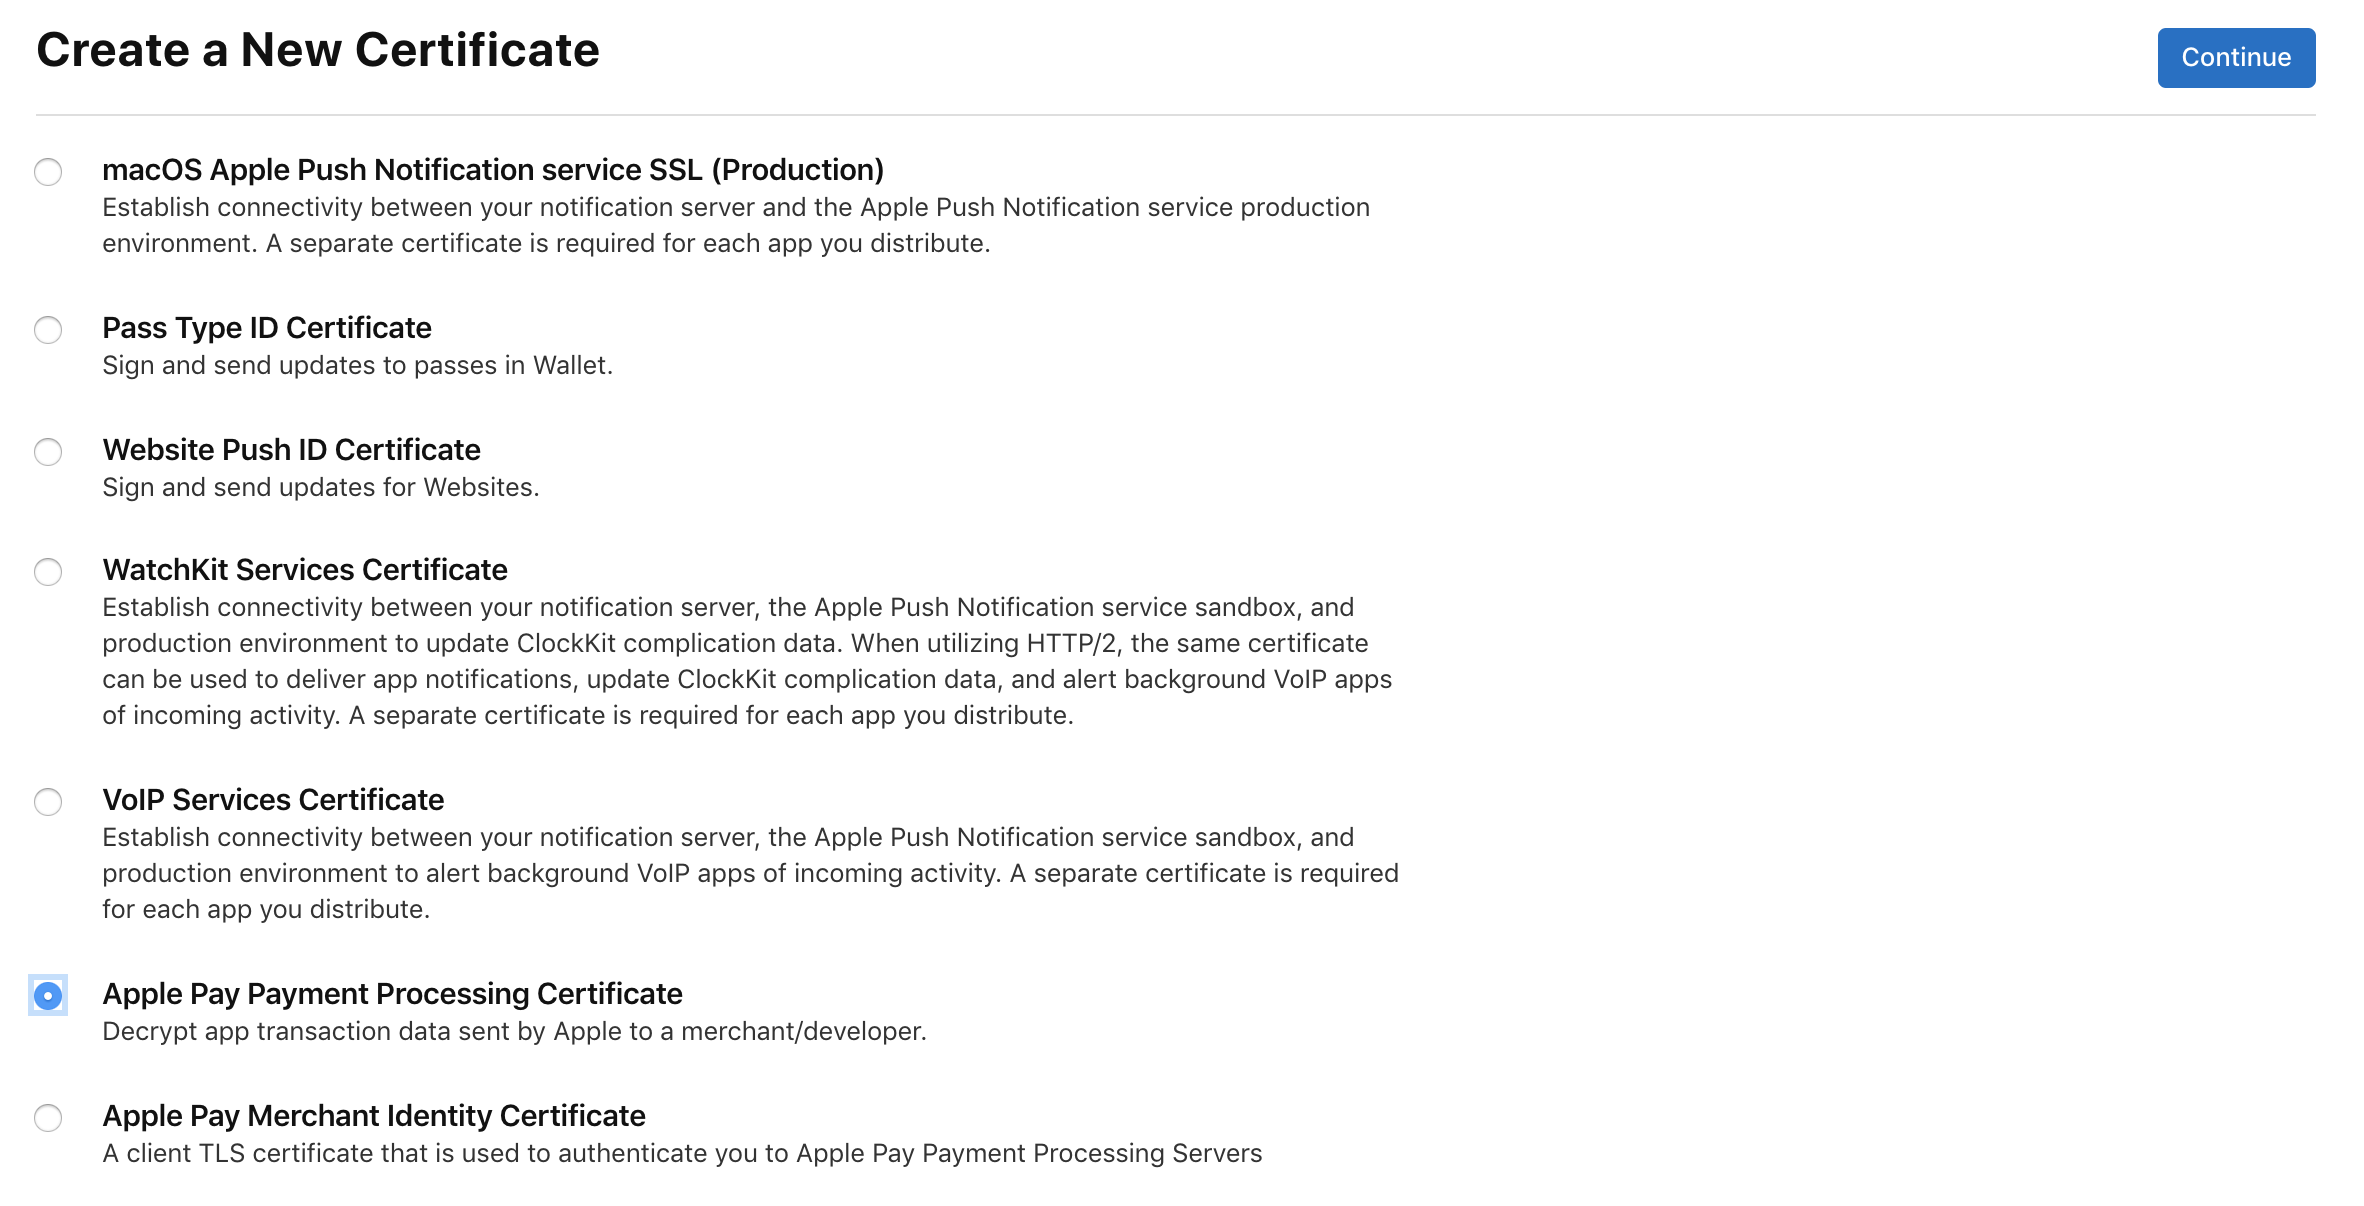
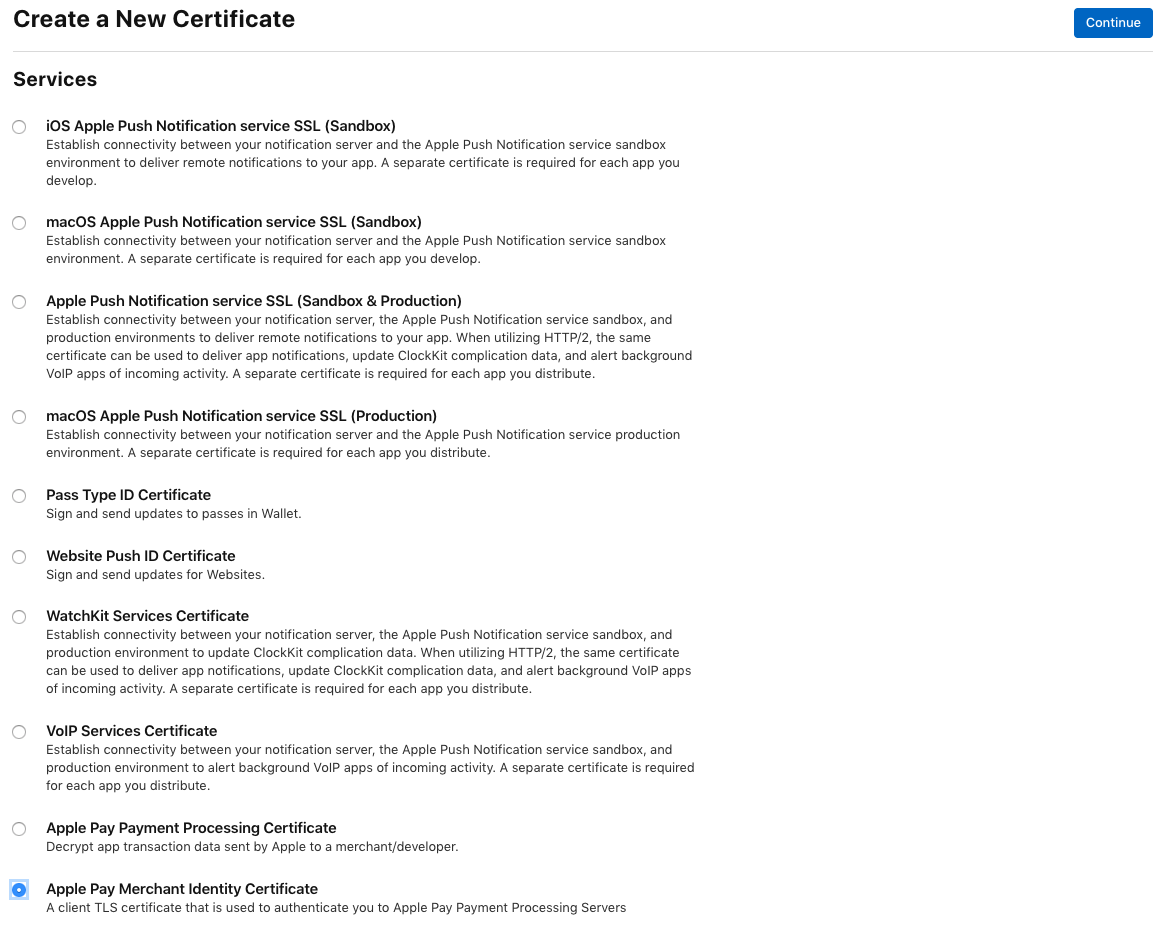
2. Select Service > Apple Pay Payment Processing Certificate, click Continue button.
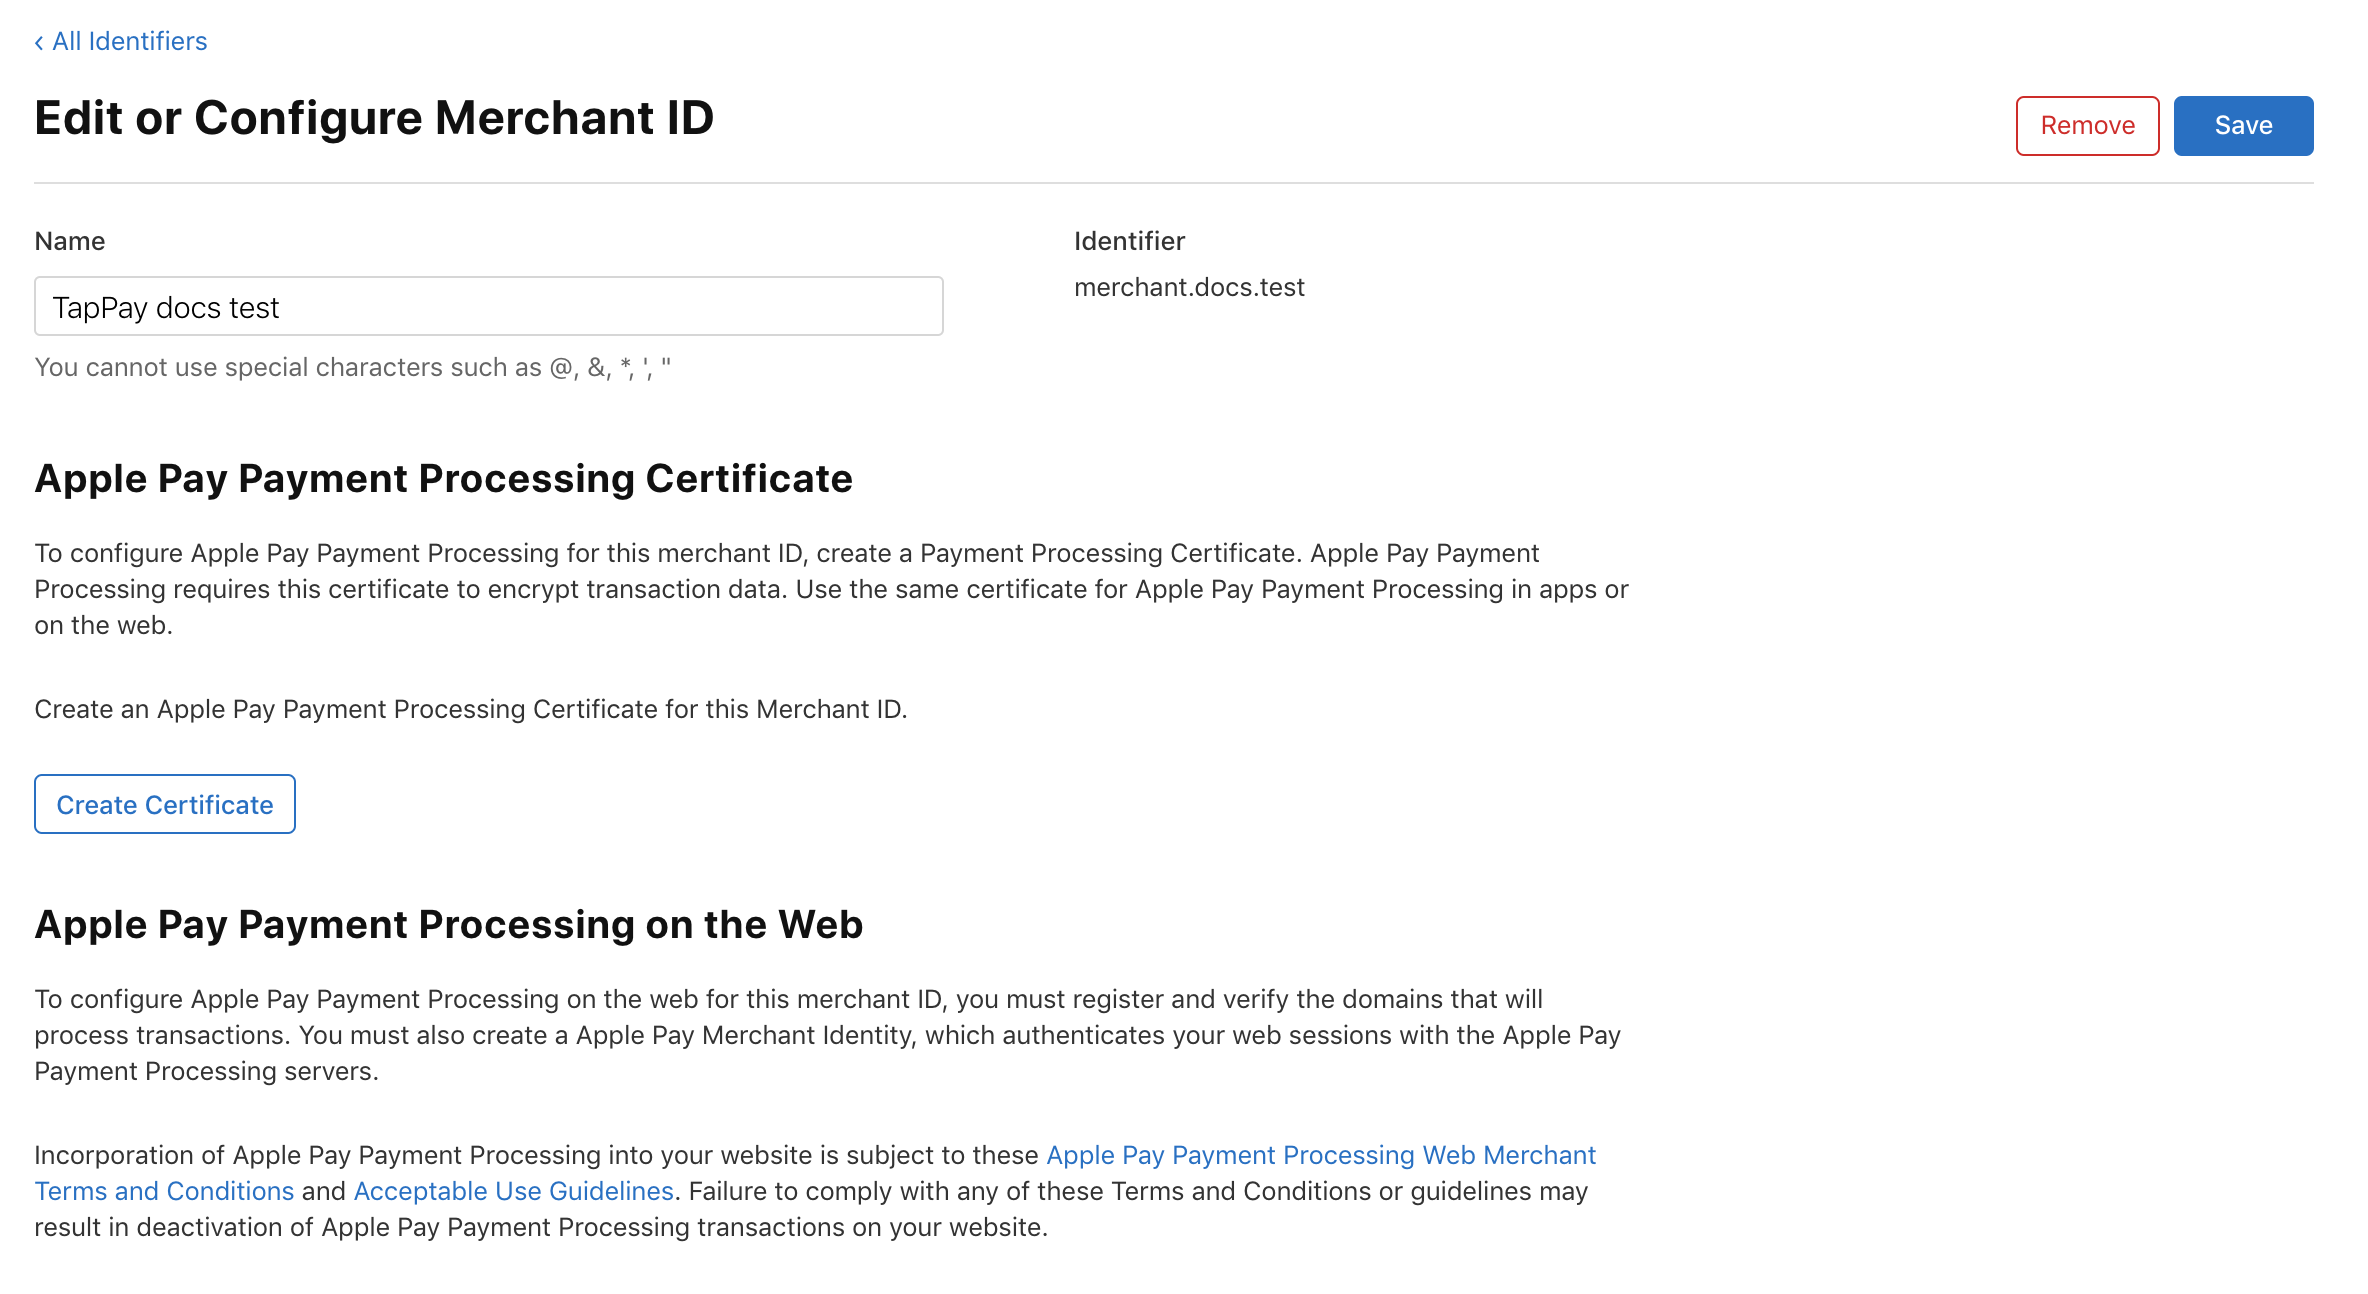
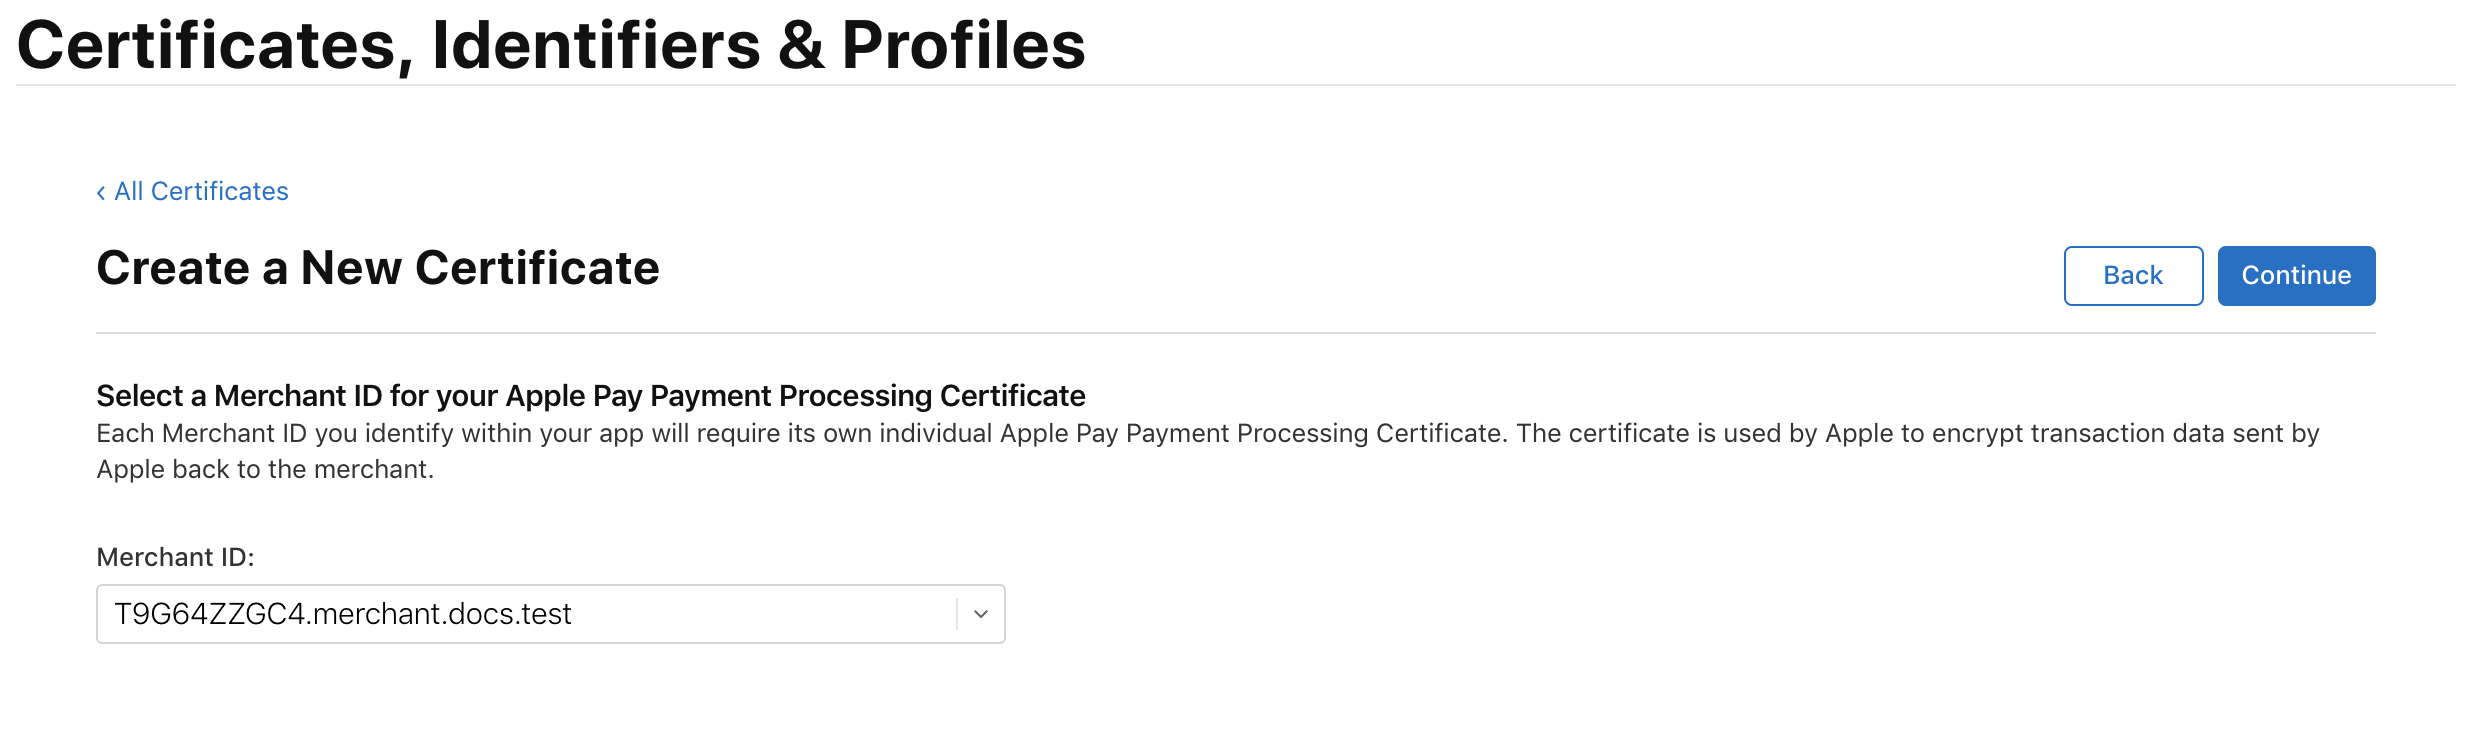
3. Select the desired Merchant ID, click Continue button.

4. Click Apple Pay Payment Processing Certificate > Create Certificate button.
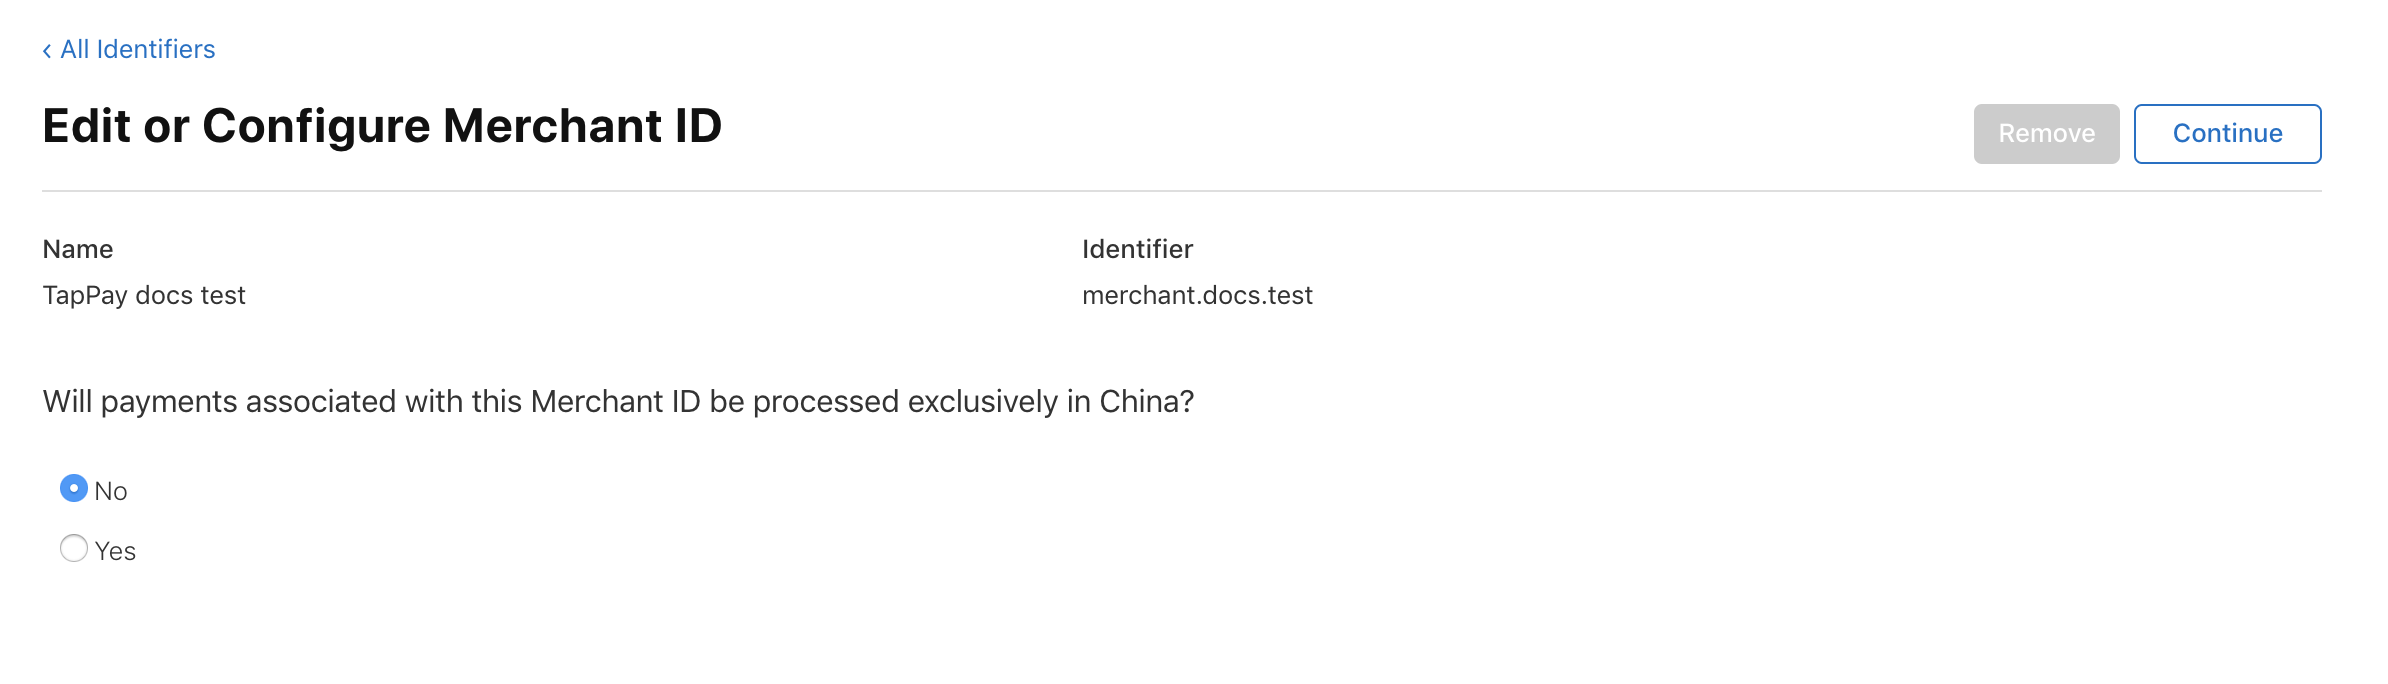
5. Click Continue button.
Please choose No. TapPay doesn’t support Union Pay for Apple Pay so far.
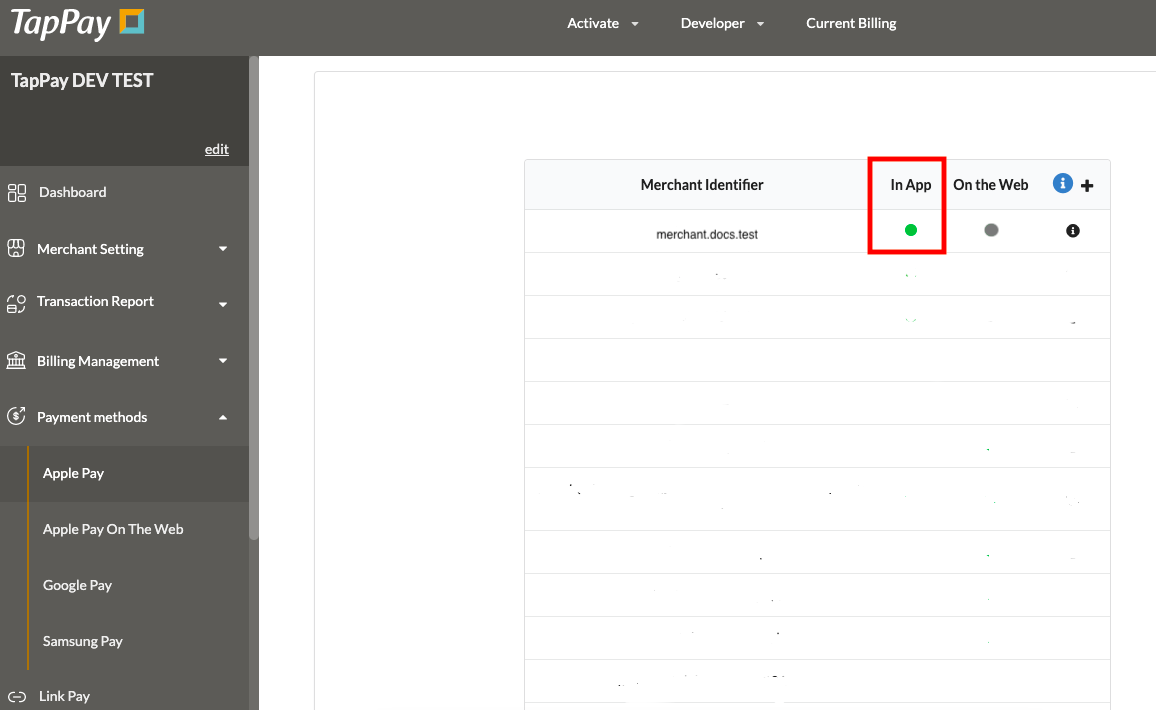
6. Log in to TapPay Portal, select Payment methods > Apple Pay, click + button.

7. Click payment_processing_certificate.csr download file, Click next button.
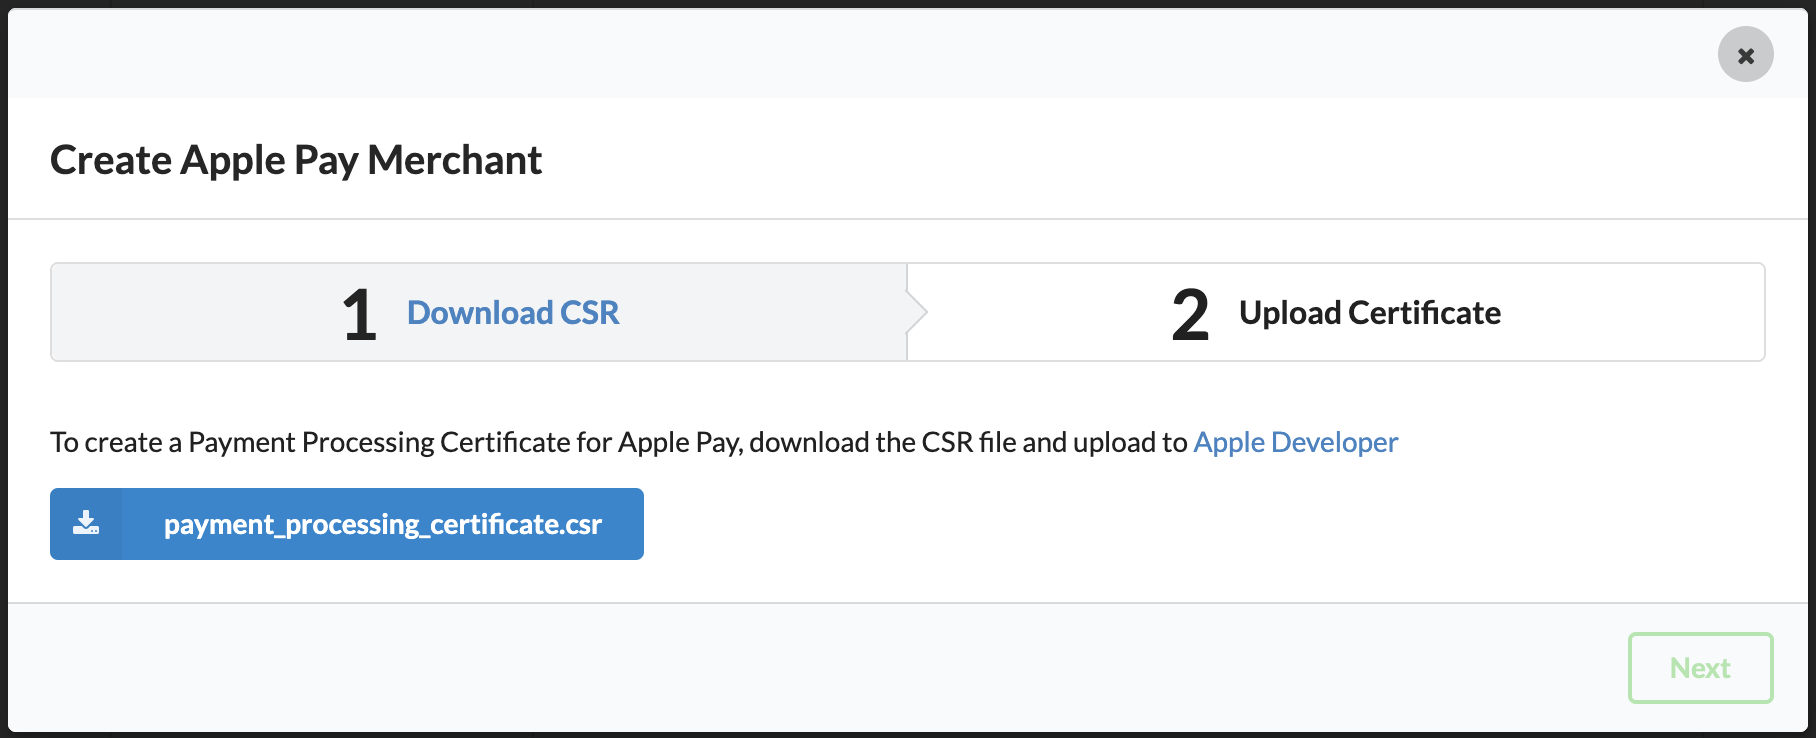
8. See the following screen, continue to step 9
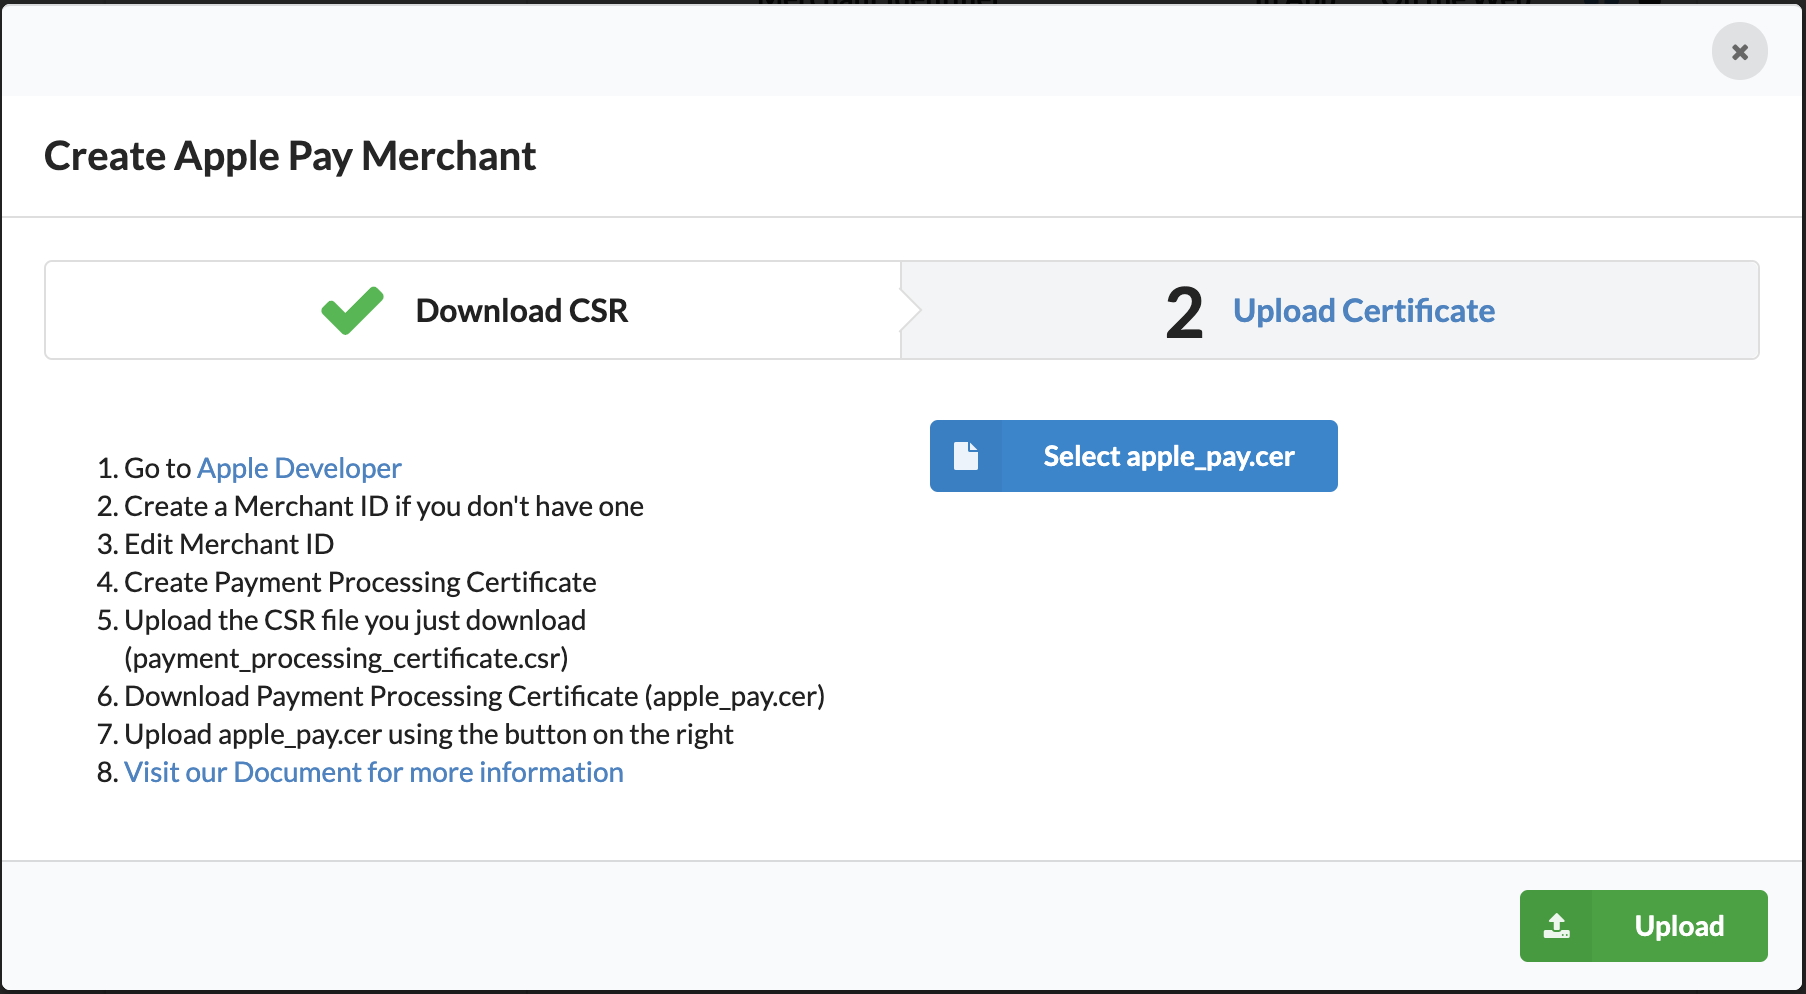
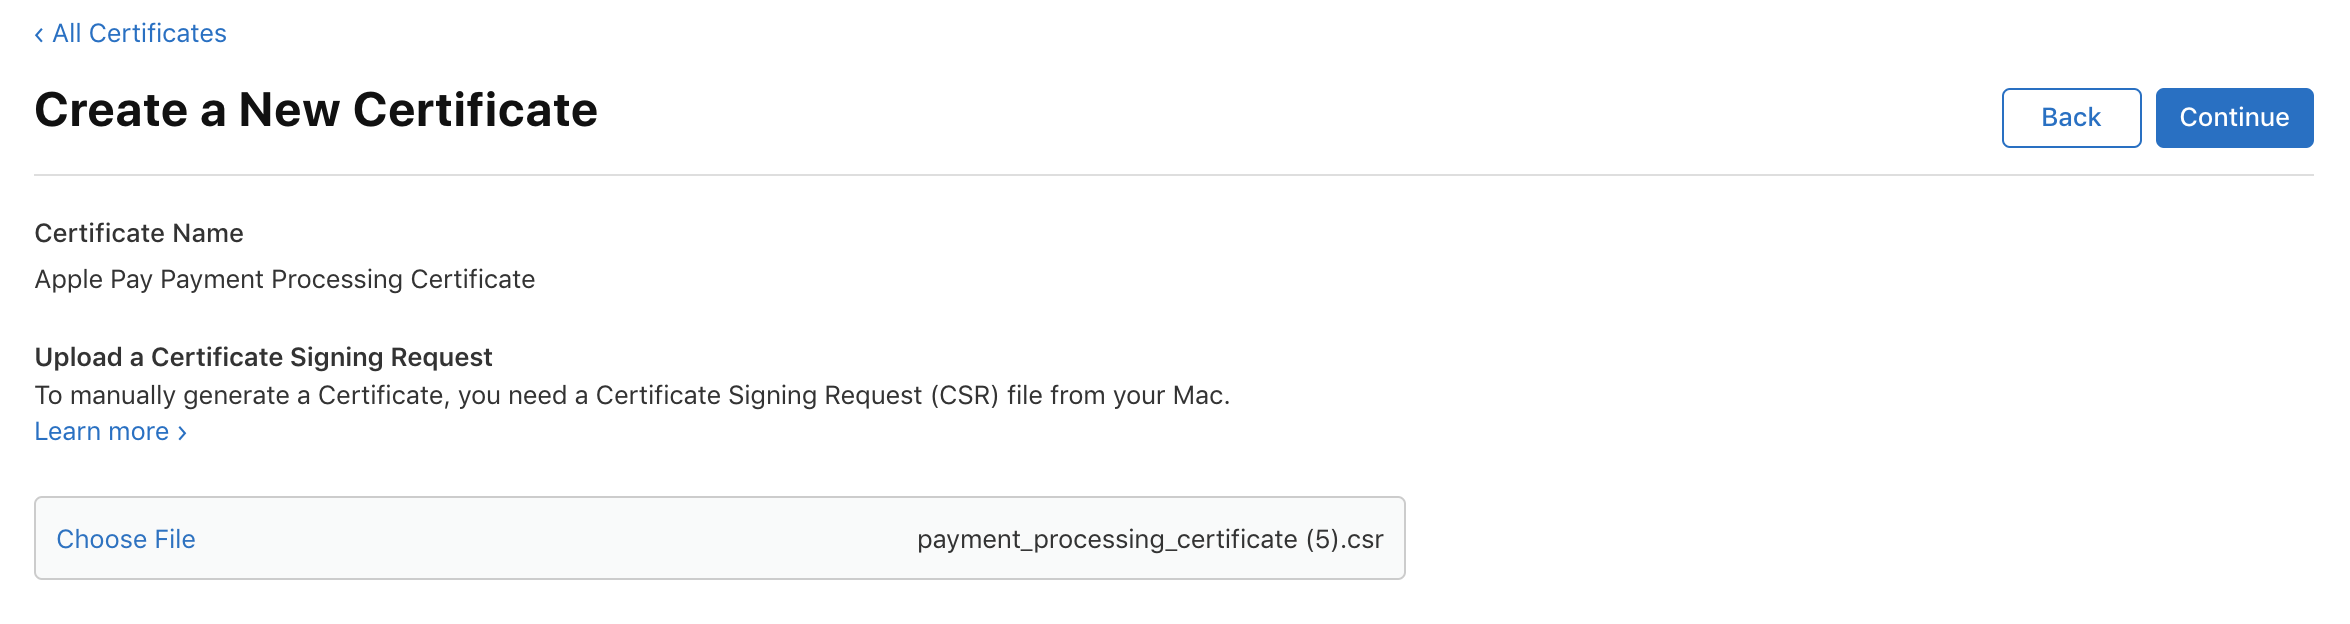
9. Go back to apple pay developer, upload your CSR file by clicking “Choose File…” Click “Continue”.
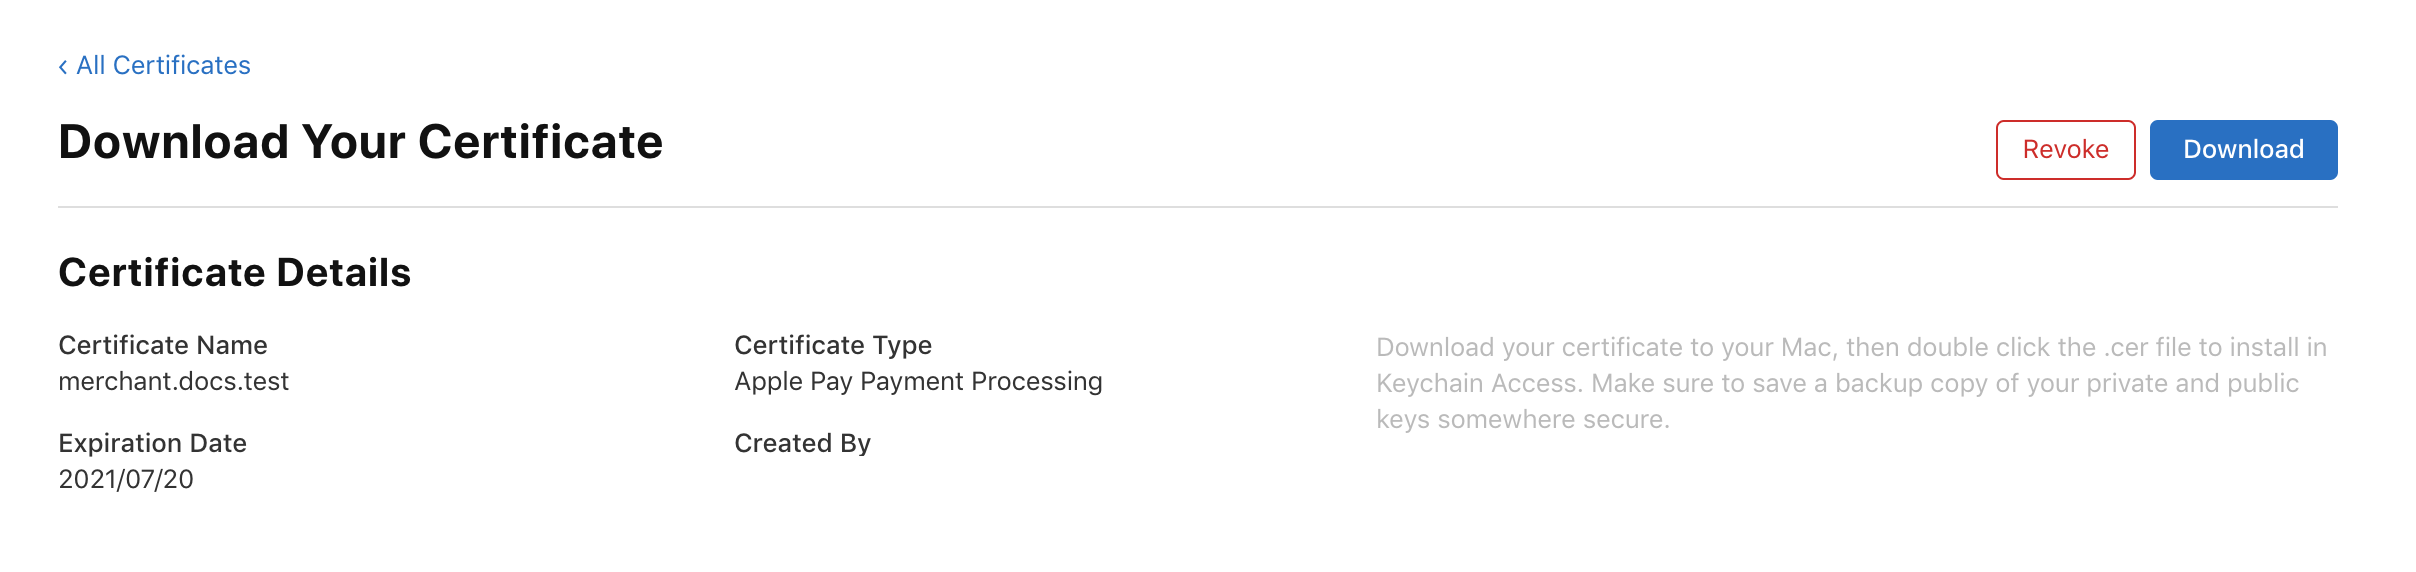
10. Click download button download apple_pay.cer file.
11. Back to TapPay Portal, click choose apple_pay.csr button and upload the resulting .cer file.
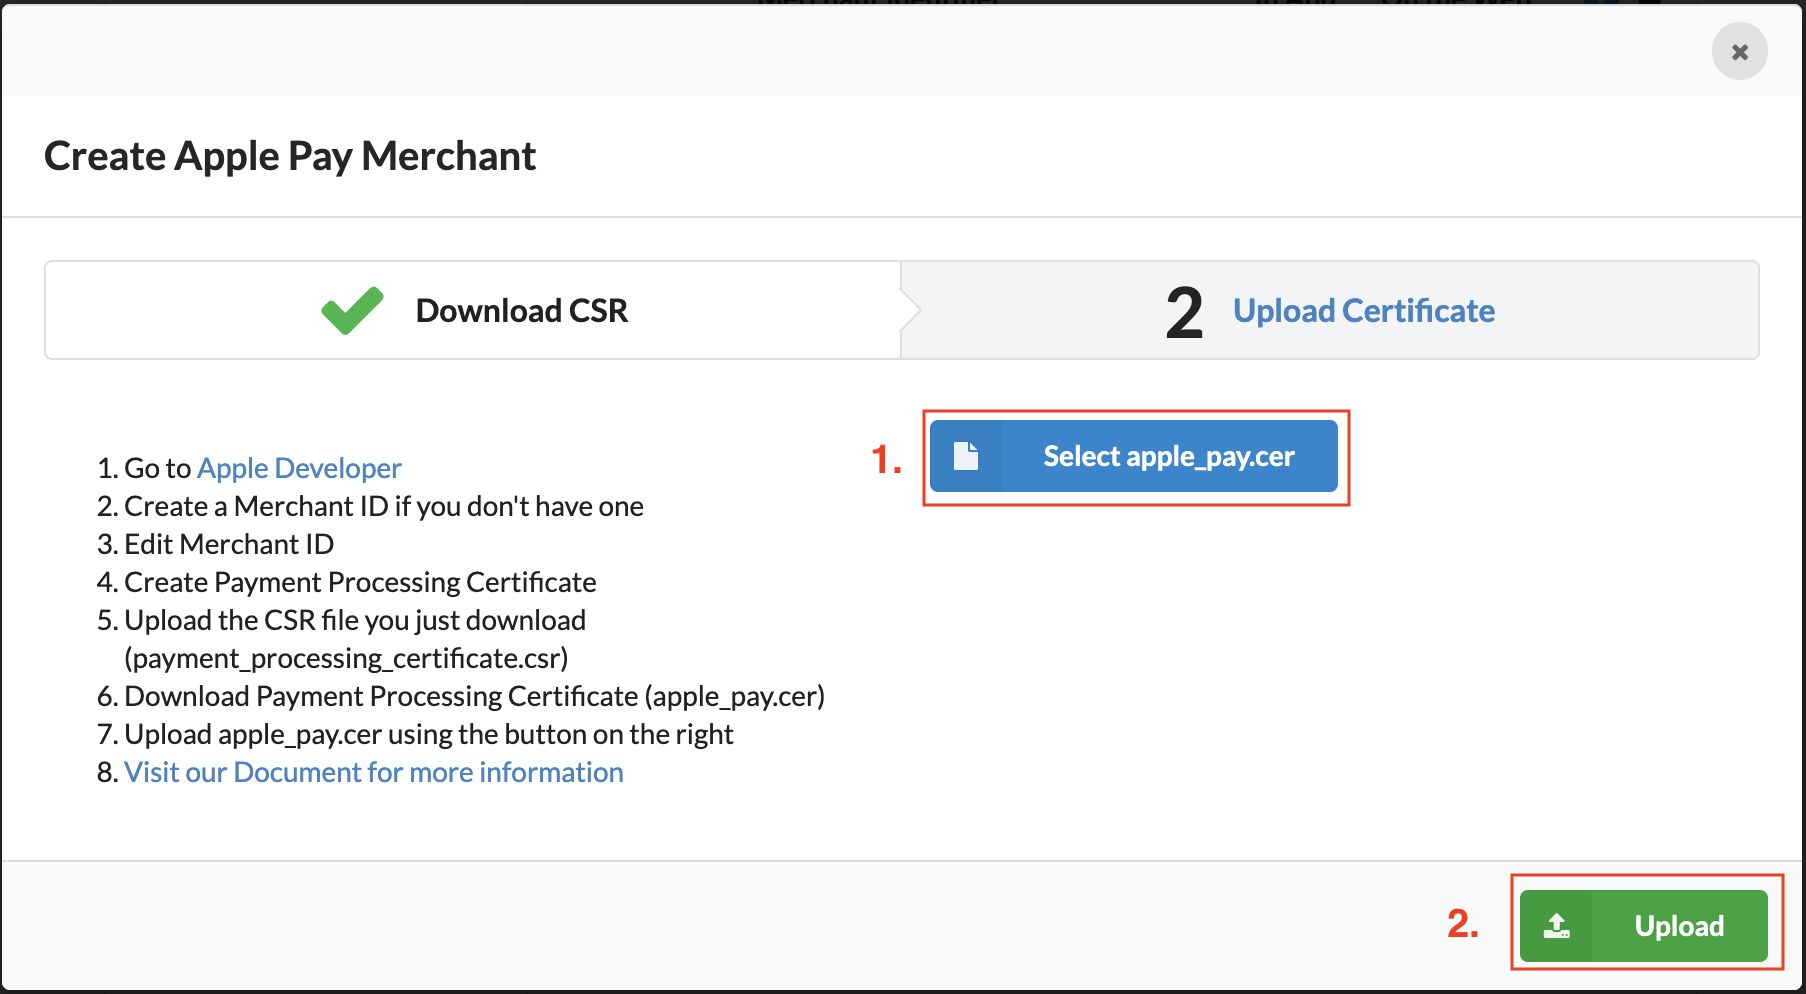
12. On the Apple Pay page, you can see the newly created Apple Pay in App, and you can start to develop (refer to Frontend> Apple Pay in Apps); if you need to create Apple Pay on the Web, please complete the follow-up actions
Create Merchant Identifier Certificate (Required only if you apply for developer account in person)
1. Select Certificate click + button.

2. Select Apple Pay Merchant Identity Certificate, Click Continue button.
3. Select desired MerchantID, click Continue button.

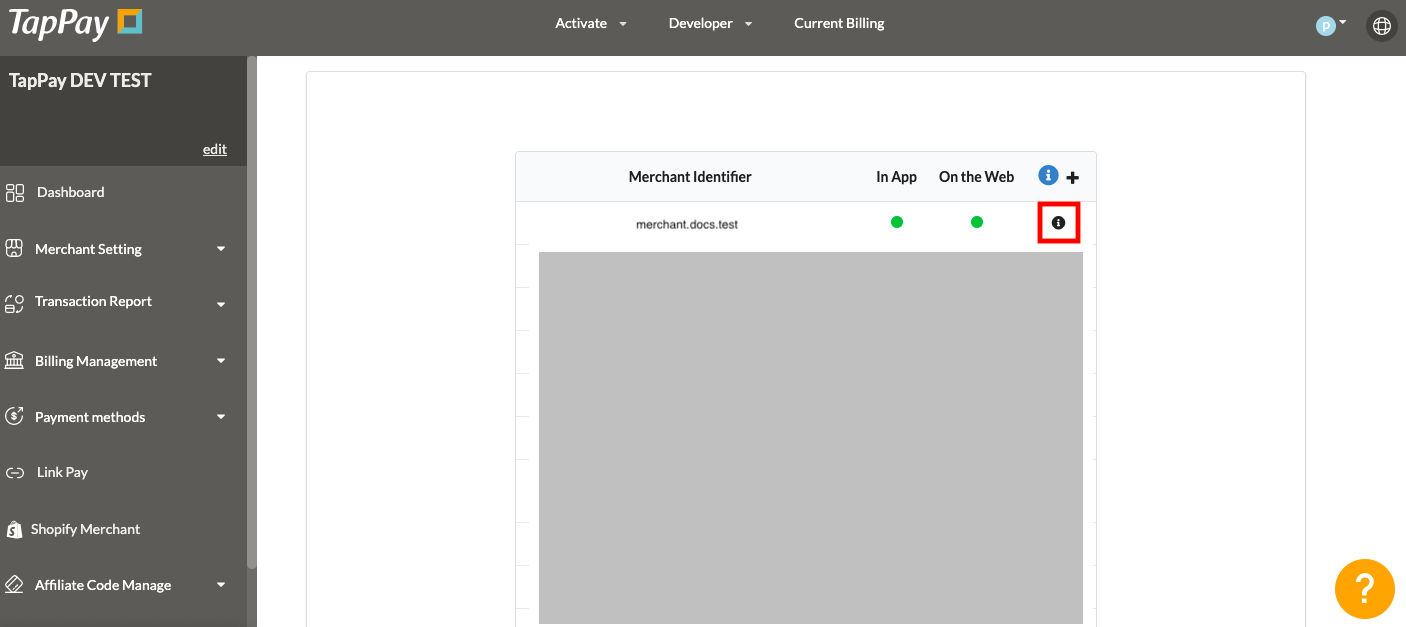
4. Log in to TapPay Portal Apple Pay, select desired Apple merchant identifier and click i.
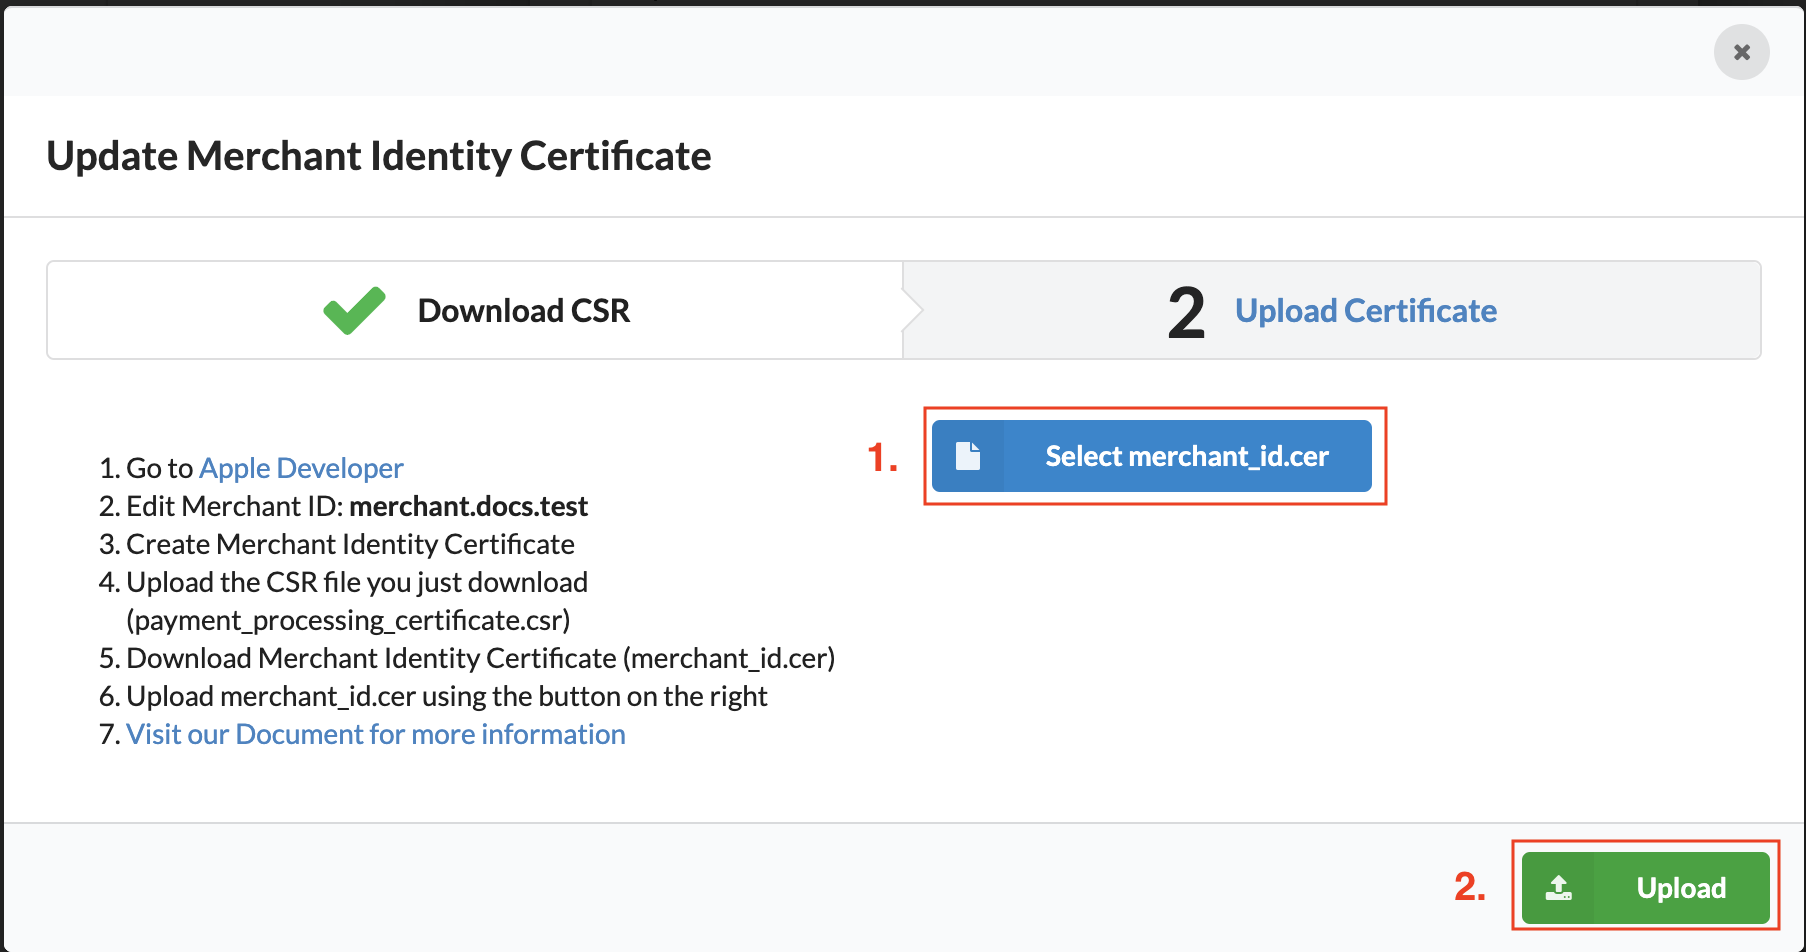
5. Click Apple Pay on the web > Upload Certificate
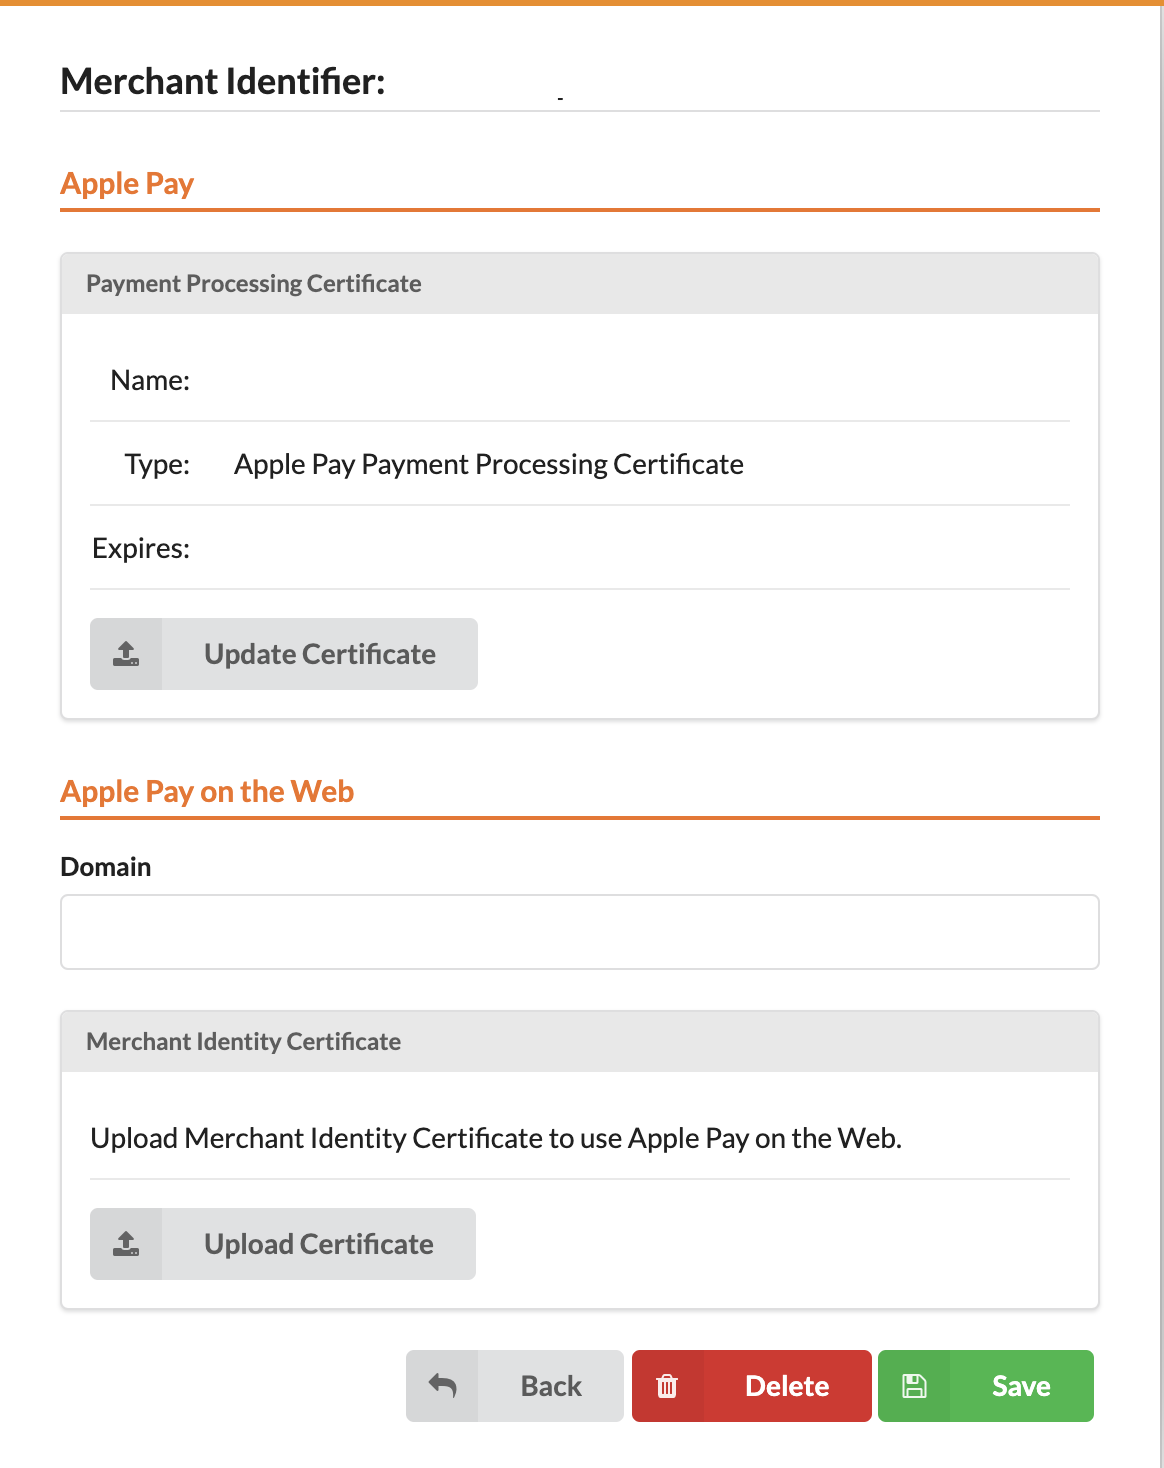
6. Download merchant_identity_certificate.csr
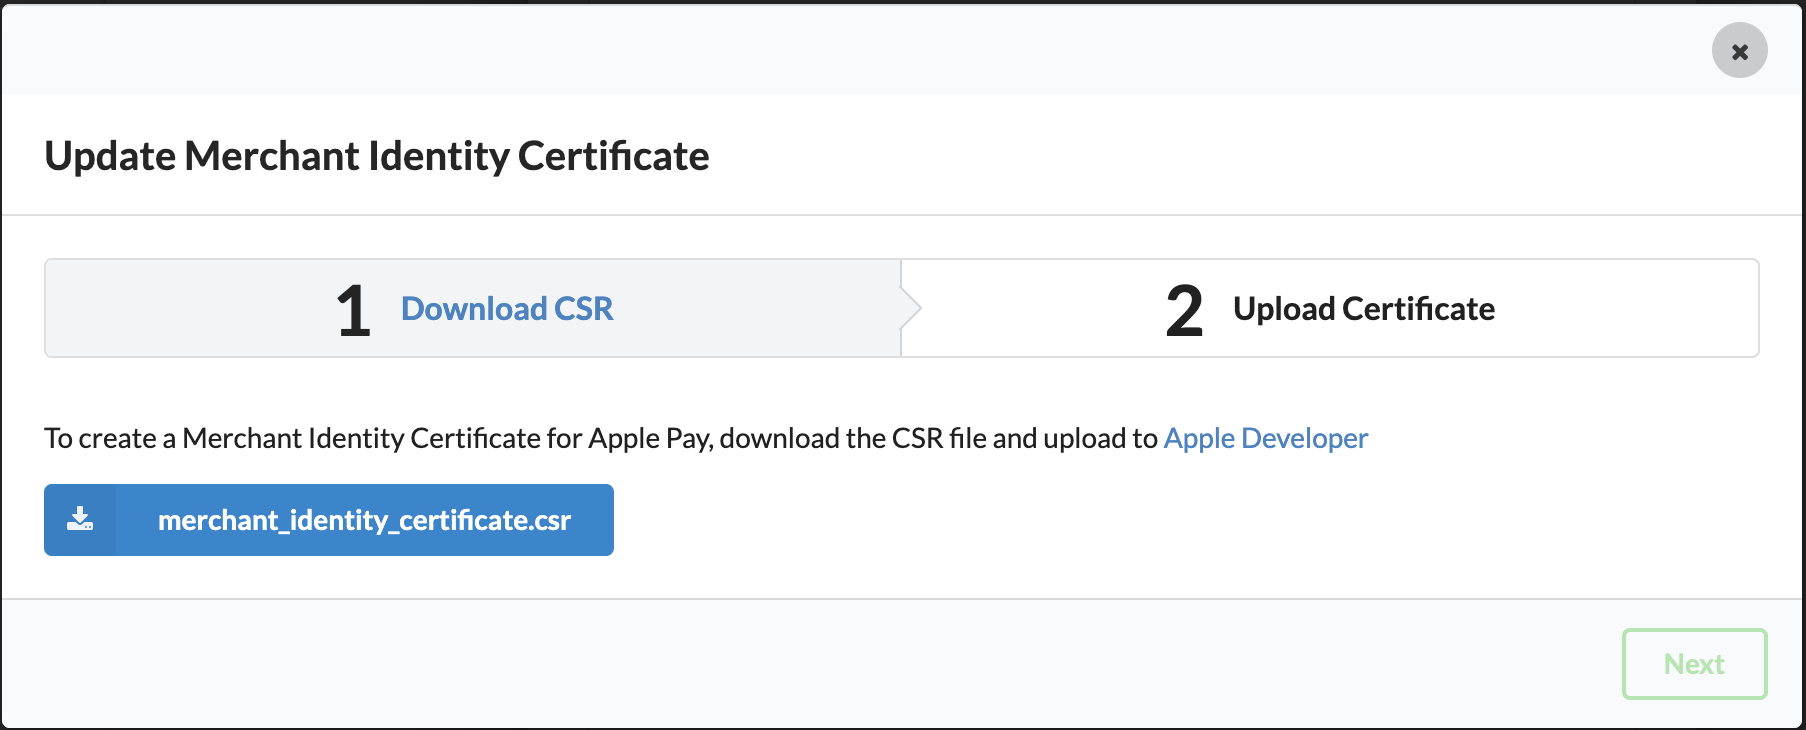
7. See the following screen, continue to step 8
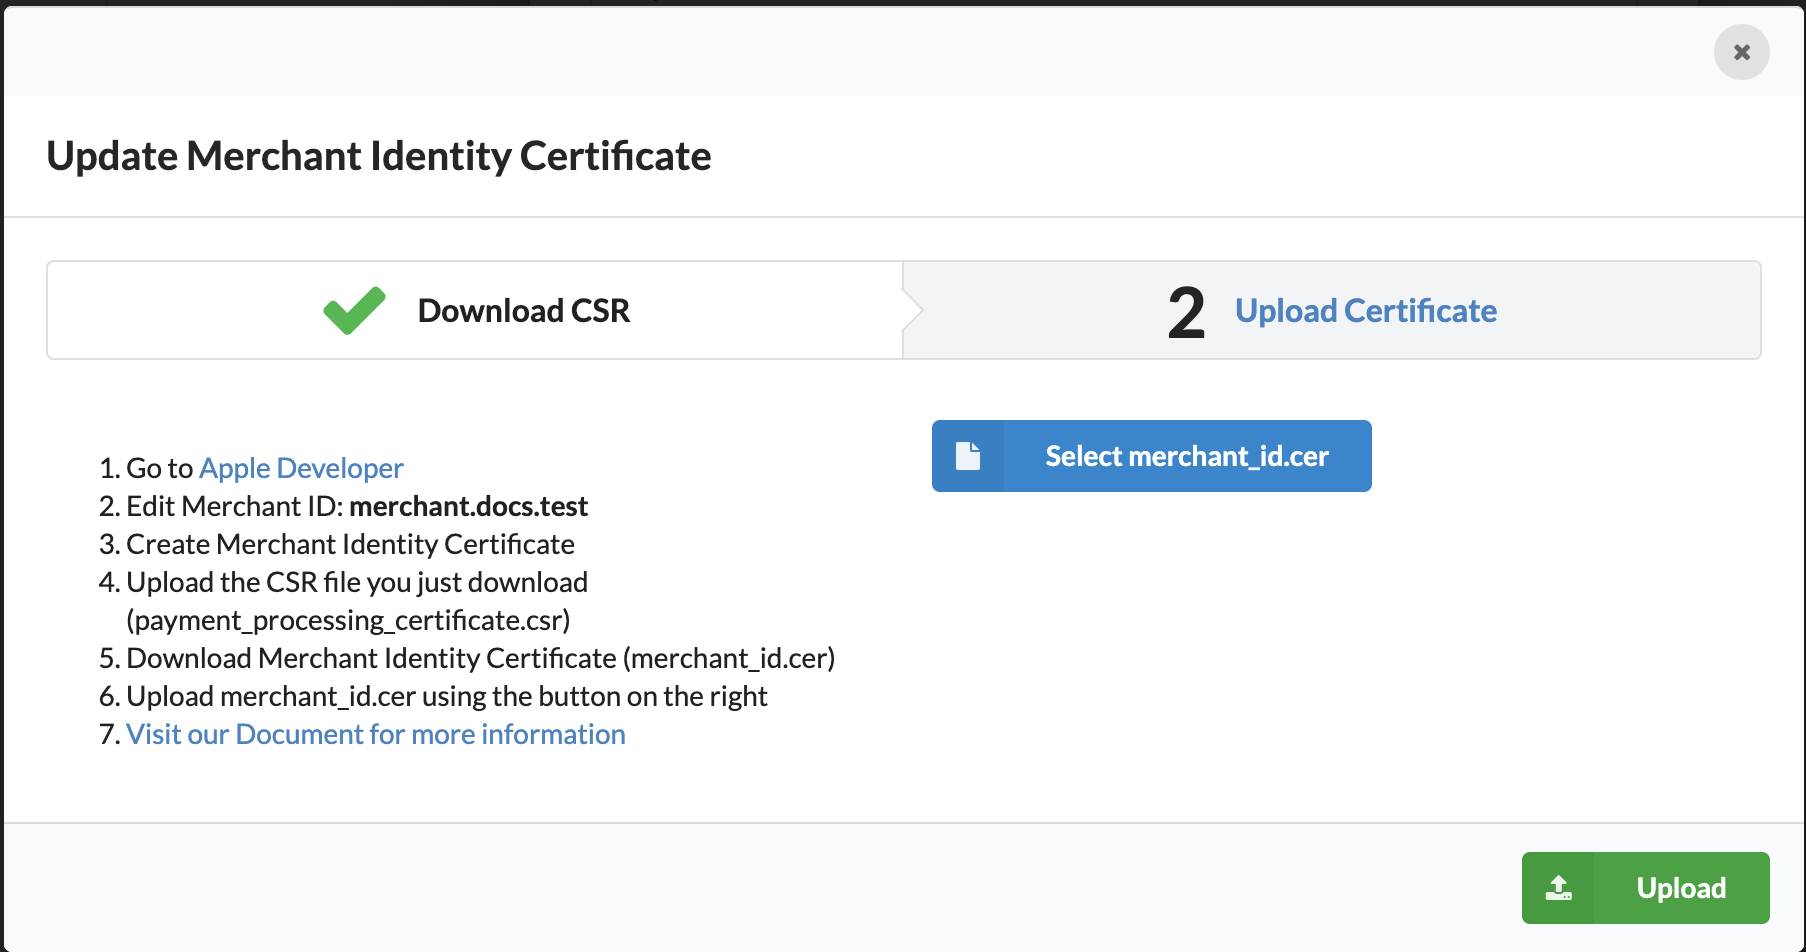
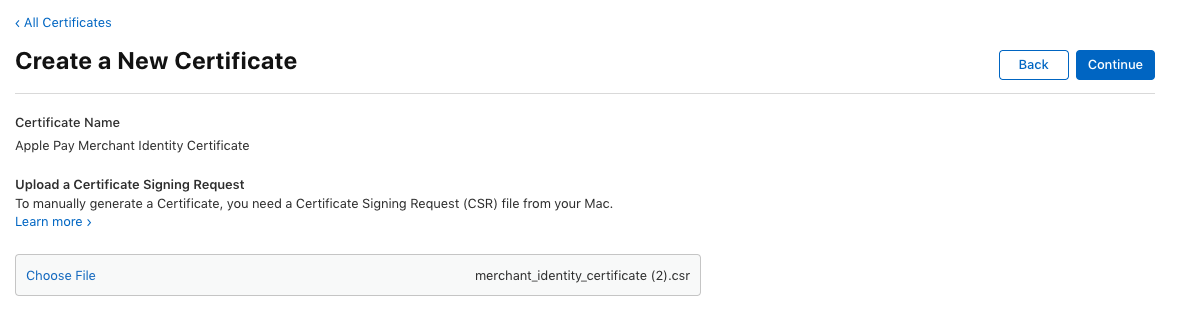
8. Upload your CSR file by clicking “Choose File…”
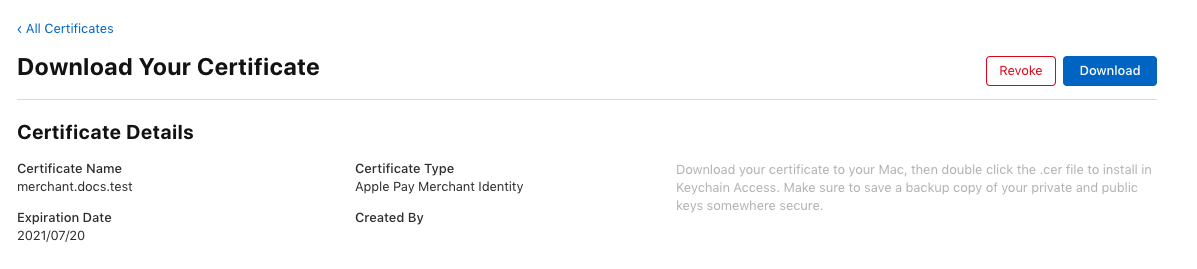
9. Go back to TapPay Portal, Click Download.
10. Upload the resulting .cer file back to TapPay Portal.
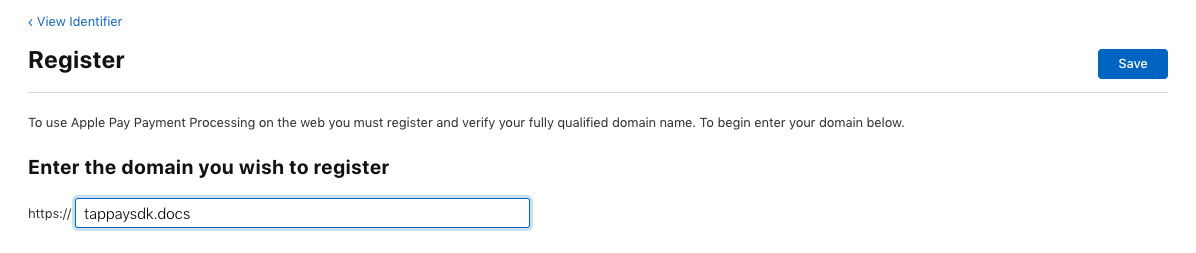
Add Domain (Required only if you apply for developer account in person)
1. Select Certificate click + button.
2. Select Service > Apple Pay Payment Processing Certificate, click Continue button.

3. Select desired MerchantID, Click Continue button.
4. Click Add Domain button.
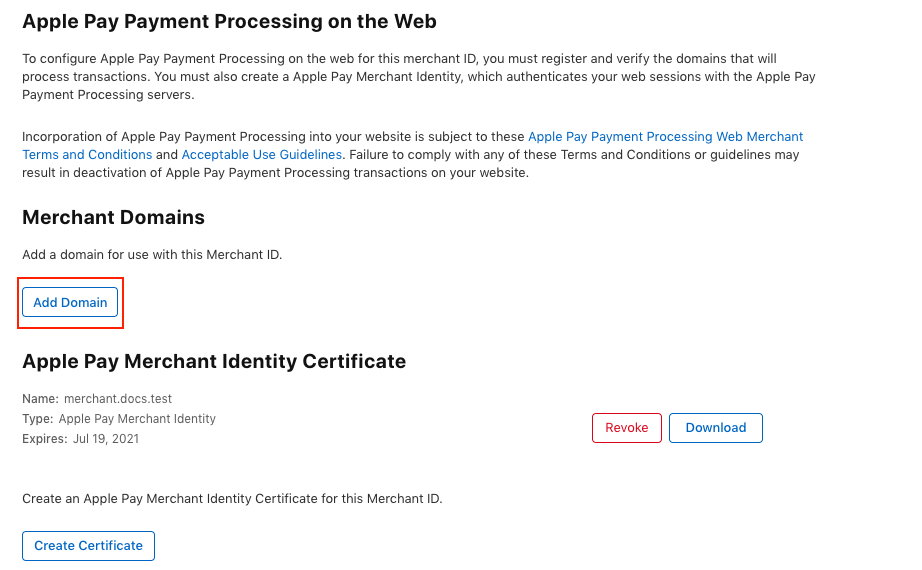
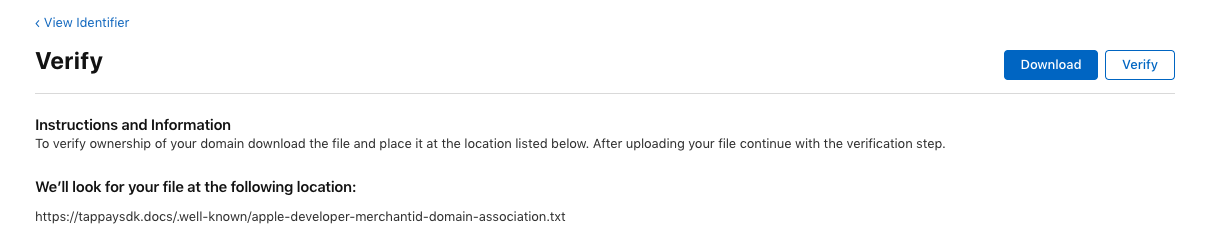
5. Fill out your domain.
6. Download the verification file and host it in the designated path. Click “Verify” after you are done.
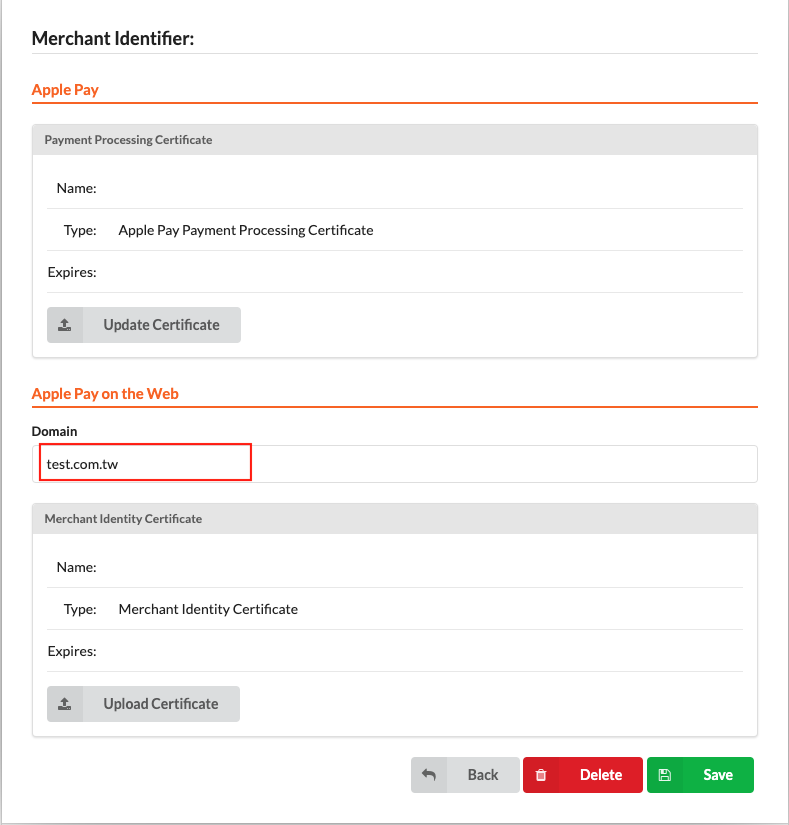
7. Go back to TapPay Portal payment methods> Apple Pay, select the Apple Pay merchant ID you want to use, and click i

8. Go to Apple Pay on the web, fill out the domain, click save
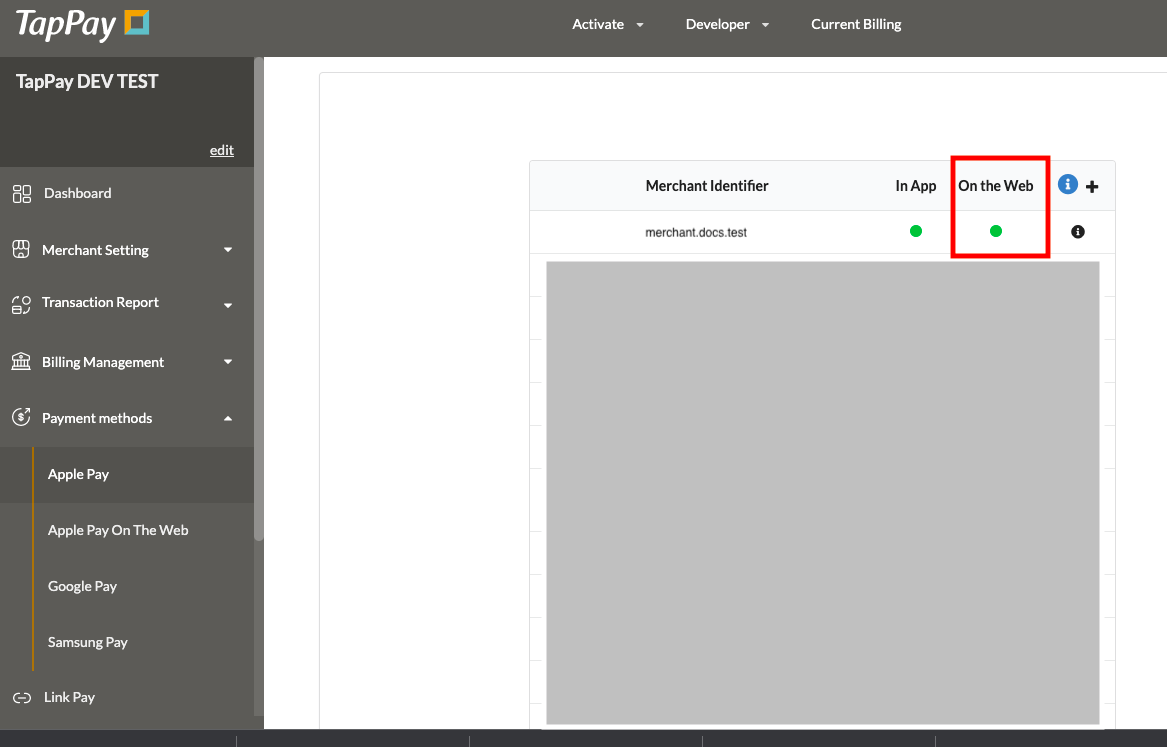
9. Apple Pay on the web is established. Please go to Frontend> Apple Pay on the Web to start develop
Apple Pay - QA
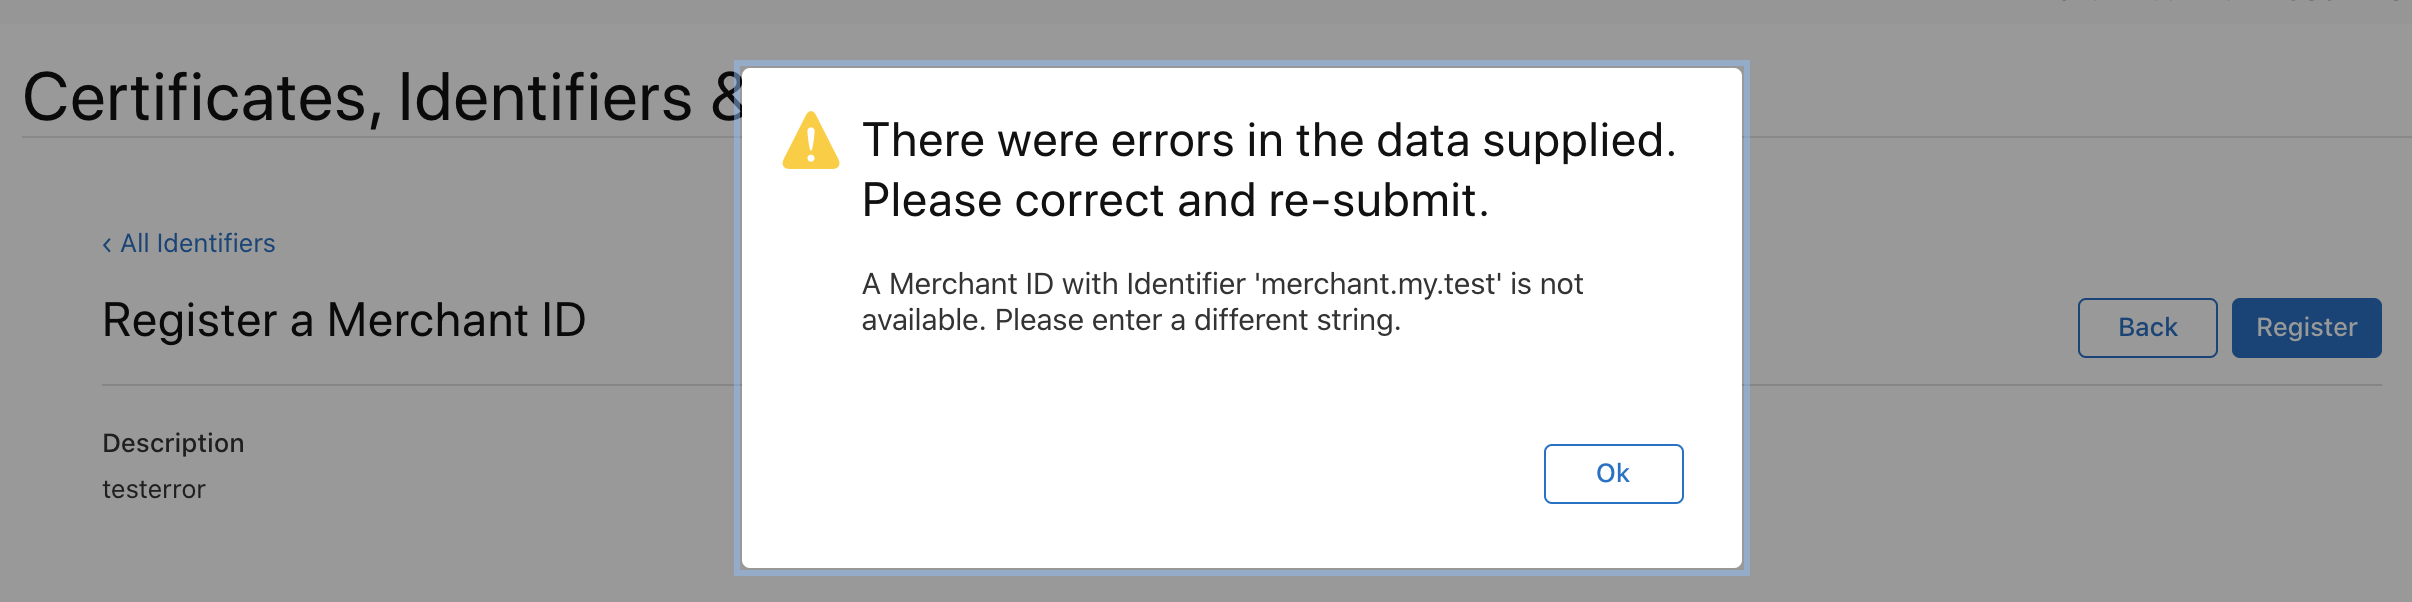
Q1 : How to solve the following error when create Merchant ID ?
This error means that your naming does not comply with Apple regulations. Please change your name and press Register
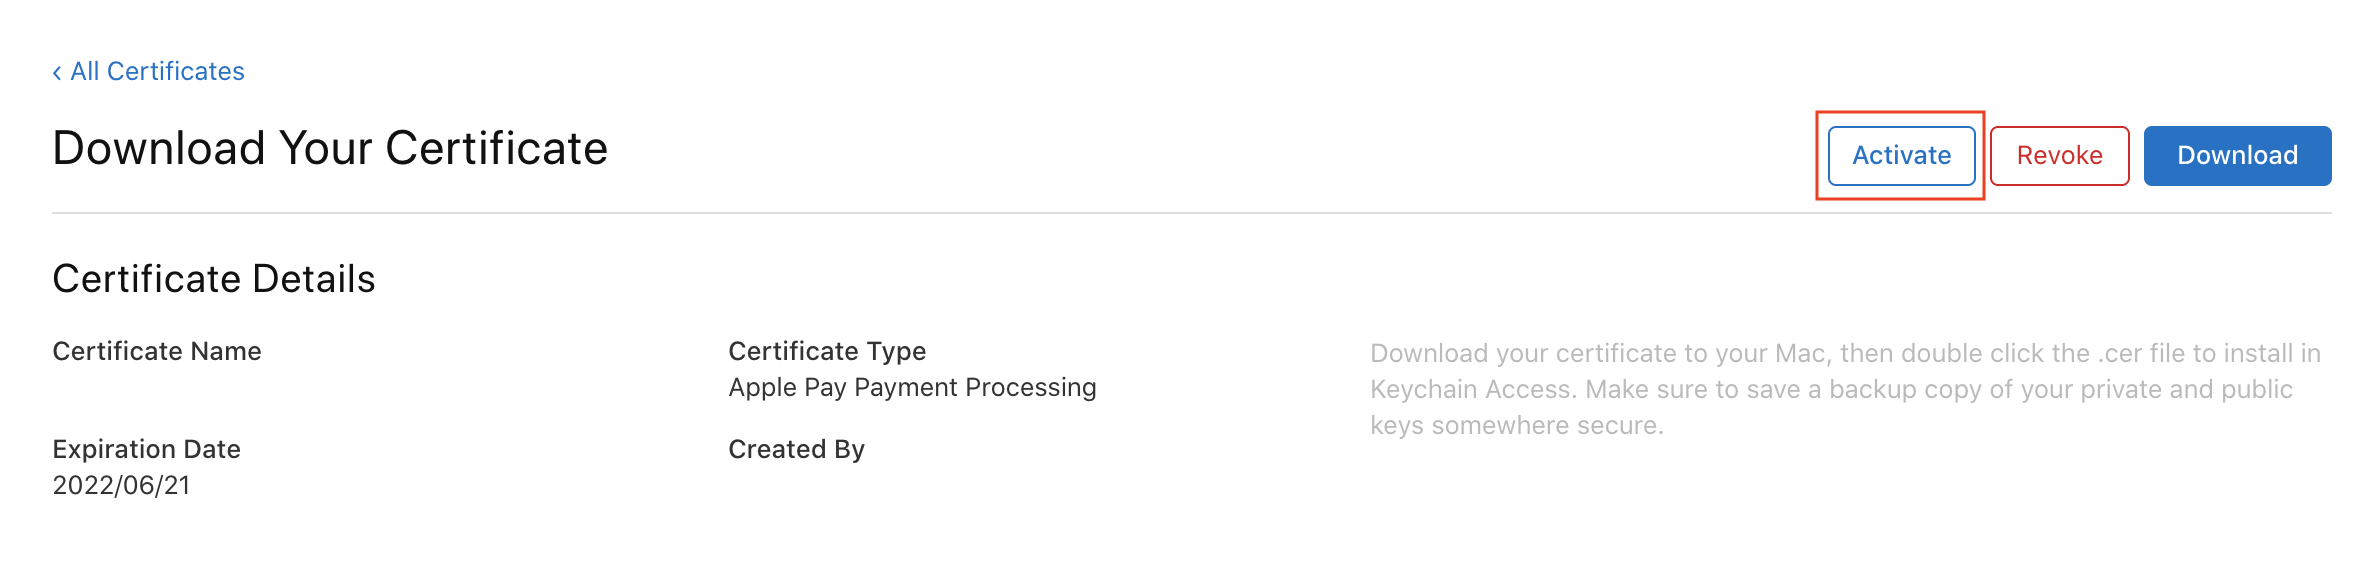
Q2 : How to renew the certificate?
Apple will notify the merchant one month before the certificate expires, you can update the certificate according to the following process
1. Go to TapPay Portal, select the Apple Merchant ID of the voucher to be updated, and click i

2. Click Update Certificate, select the certificate just created, upload the update certificate
3. Please re-apply for Payment Processing Certificate and Merchant Identify Certificate(You can refer to the following link : Payment Processing Certificate, Merchant Identify Certificate)
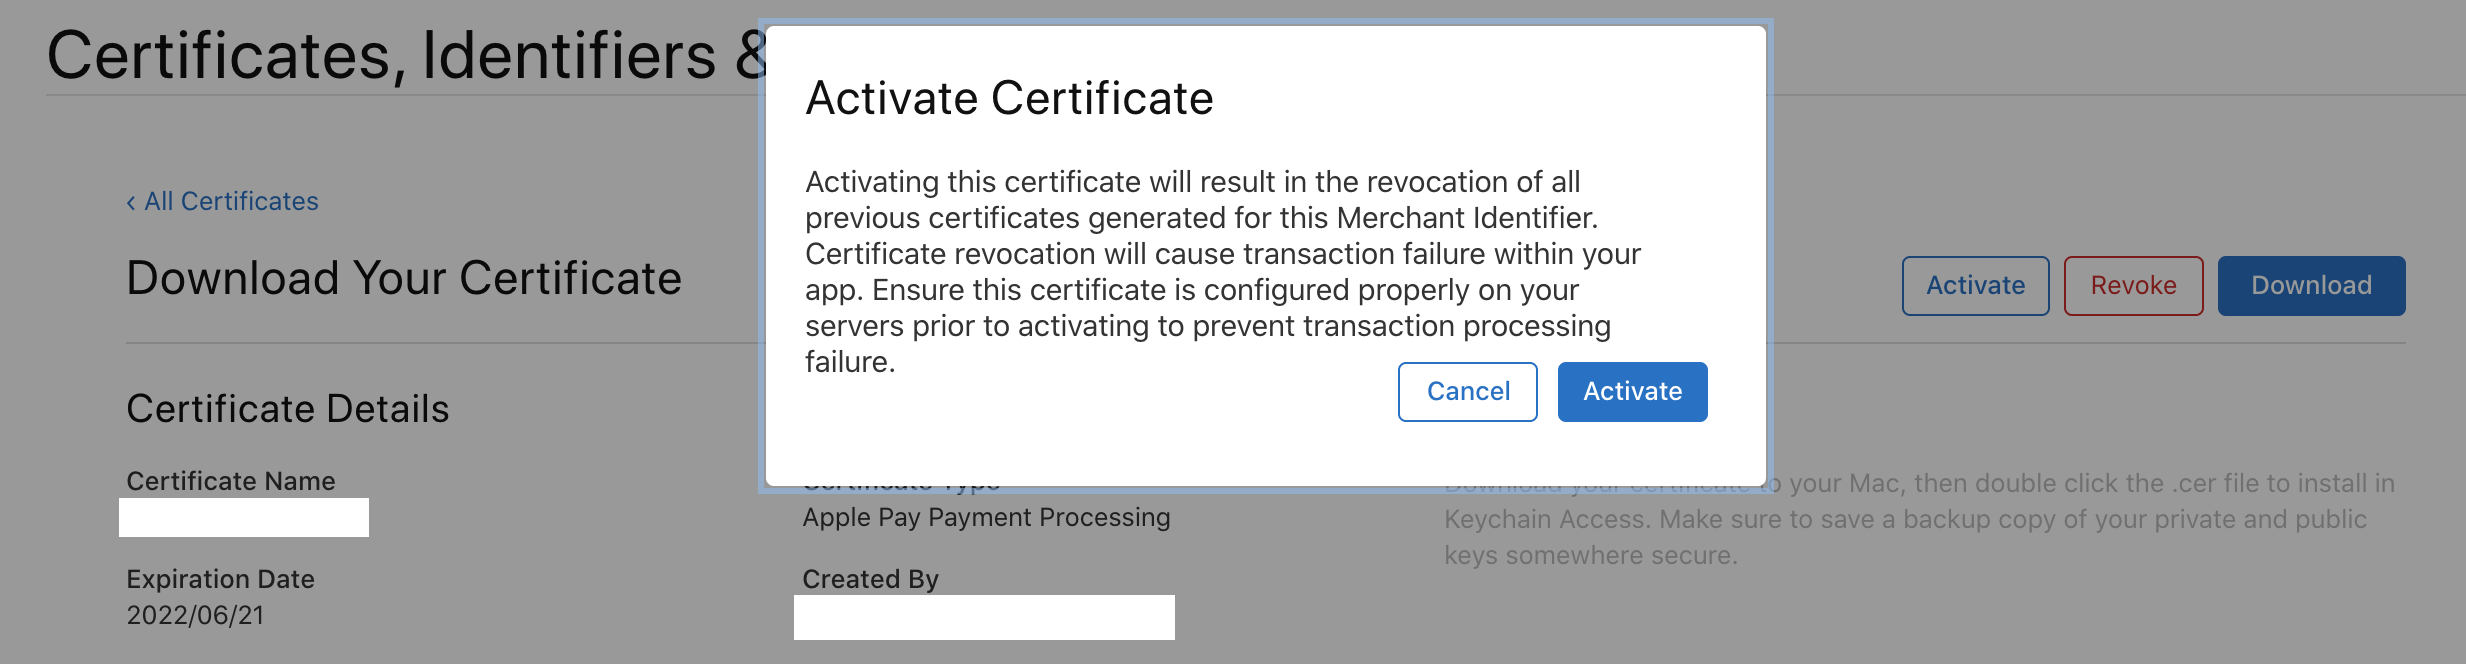
*When you apply for a new certificate, the following screen will appear
Please click Activate (The old certificate will be revoke)
(When you already have two sets of certificates, Apple will ask you if you want to activate the new certificate)
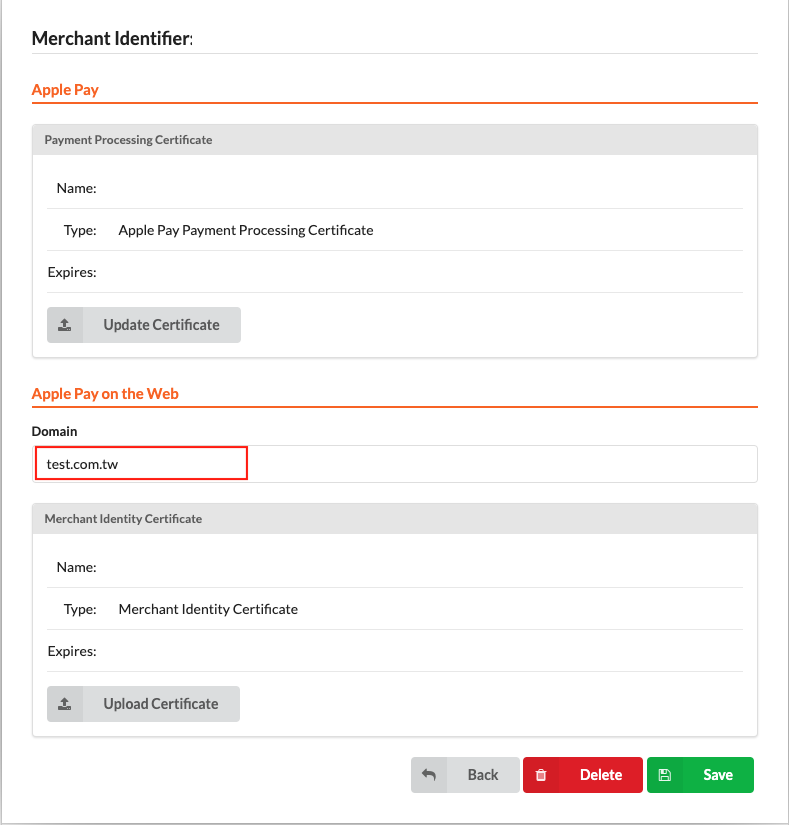
Q3 : Domain verification failed
Ans : If continuous verification is not possible, please cooperate with your IT staff to perform the following tests
1. Use SSL checker (https://www.sslshopper.com/ssl-checker.html) ,Confirm whether the SSL certificate has reached A + level
2. All pages containing Apple Pay must have HTTPS, which is necessary in both formal and test environments. In the development environment, you can meet the needs of HTTPS through the ngrok service. You can refer to our
Ngrok tutorial